WP Super Cache Settings
WP Super Cache Settings for Your Wordpress Blog
.png)
WP Super Cache is among the most popular Wordpress caching plugins in the Wordpress plugin repository. It has more than one million active installations and requires no technical knowledge for configuration.
The best thing about WP SUper cache is that it is very easy to configure. It provides two types of caching settings including simple and expert. The simple caching configurations are for those users who do not want any complicated settings and simply need to cache website files. The expert method is for those who can edit files at the server level.
The WP Super cache plugin generates static cache files that are served to users when requested instead of heavier php files which will only increase the burden on the server. Static html files are comparatively a lot faster than the php files that the Wordpress sites are made iup of. It improves the loading times of your Wordpress blog.
Enable Cache in WP Super cache
.png)
Enabling Cache with WP Super Cache does not require any major expertise. It is as simple as a single click. Go to the wordpress dashboard and then to plugins. Click on add new plugin and then add WP Super Cache.
Activate the plugin and then on the first tab titled easy, enable the check box titled enable caching. The plugin will start caching your website. It is as simple as that.
The simple caching method is the recommended method for using the WP Super cache plugin as it does not require any technical expertise or users do not need to make any changes to the .htaccess file for caching. Even in the simple caching mode, one can keep some portions of Wordpress dynamic or uncached. It means you can exclude certain files from cache.
The expert caching mode is slightly risky since it requires changes to the .htaccess file. It also requires mod-rewrite to be enabled at the server level. Using Apache’s mod_rewrite, the plugin serves super cached html files and this is the fastest method. So, if you are a technical expert, you can opt for this mode and speed up your blog a lot. However, it is the recommended method since editing the .htaccess file is certainly risky and any errors can cause the site to not function properly.
Advanced settings WP Super cache
Move to the second tab titled advanced settings. In this page select Simple for the cache delivery method.
In the cache restrictions section enable the checkbox ‘Disable caching for logged in visitors’. Enable compression by ticking the checkbox titled ‘compress pages so they are served more quickly to visitors.’ Compression is essential for website speed and the plugin can automatically enable it for your website by making the necessary changes inside the .htaccess file. You will not need to enable it, if you are already using gzip compression on your website.
Enable cache rebuild and also enable 304 browser caching. You can aso disable the caching of query strings by clicking the check box titled don’t cache pages with get parameters.
Now, scroll down to the bottom where you will find a list of url tracking parameters that can be ignored. Enable the checkbox under the box to enable this feature. Now, the plugin will ignore these tracking parameters and serve the users coming from facebook, Twitter or other sources a cached file.
You will not need to enable mobile support in the advanced section if you are not using AMP on your wordpress blog.
In the advanced section, you will also find a list of pages that you want to exclude from cache. If you want to exclude a certain page type like feeds, you will just need to check the checkbox next to it. If you constantly update posts or the home page is constantly changing on your website, you can exclude the home page from caching. Similarly, you can exclude archives and search pages from caching.
Using CDN With WP Super Cache
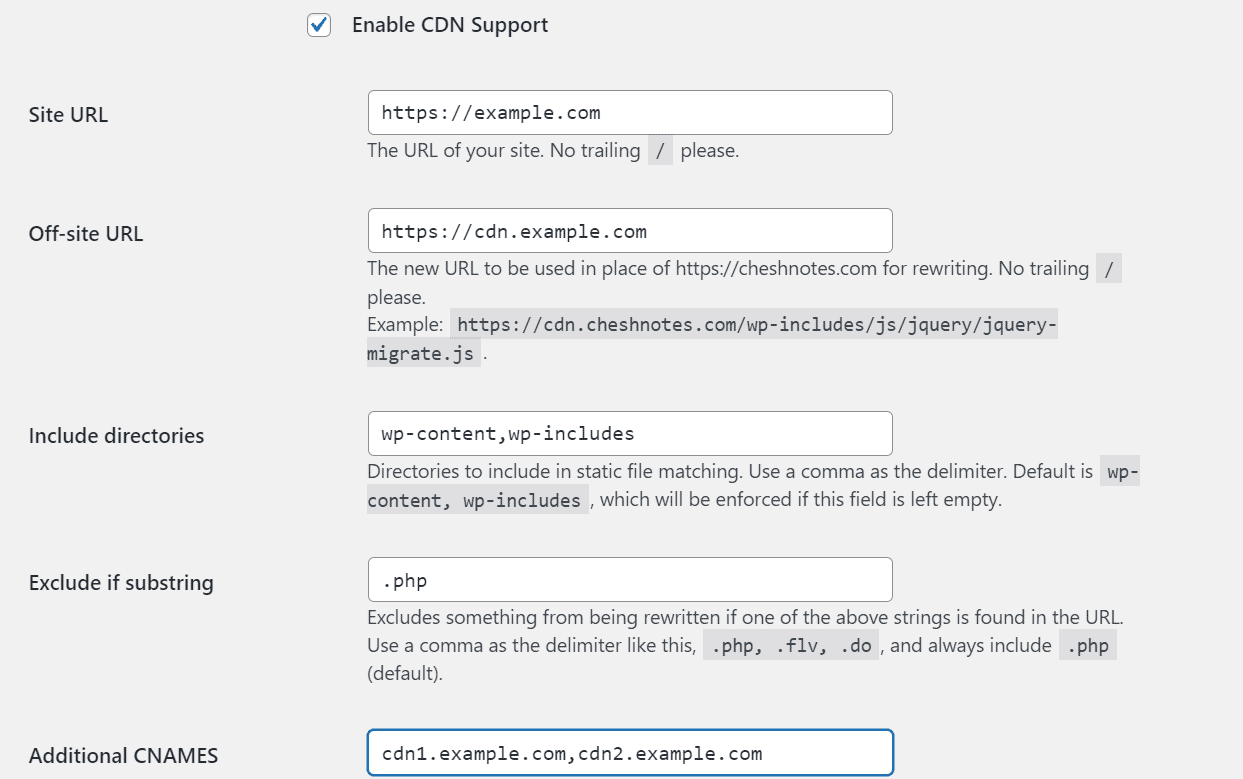
WP Super cache also allows you to use cdn for your website and will automatically rewrite the urls. All you need to do is to go to the cdn tab and enable the service for your website.
In the onsite url, enter the homepage of your blog and in the offsite url, enter the cdn url. For example, you can add the cdn url like cdn.example.com in the offsite url box.
The WP-Include and WP-Content directories are included by default. Similarly, the .php extension is excluded from cdn by default and if you need to add any other extensions, you can add them in the same box for exclusion.
At the bottom, you will find the box for additional CNAMES, where you can add more cdn urls if you are planning to use more than one to boost performance. Add a comma separated list of cdn urls like cdn1.example.com, cdn2.example.com,cdn3.example.com and so on.
Before you save the changes, check once if the cdn urls are working as expected and then save the changes. You can test with some static urls like https://cdn.example.com/wp-includes/js/jquery/jquery-migrate.js to make sure your cdn is working as expected. If it is working fine and the static assets are loading, go on and save the changes.
Cache Stats and Preloading
On the contents tab in the Wp Super Cache settings, you can find the details related to cached files. You can regenerate cache stats from this tab as well as check out the list of cached files.
Next to the contents tab, you will find the preload tab, where you can configure cache preloading.
Select the preload mode as garbage collections disabled to enable cache preloading. Set cache preloading to refresh every 800 minutes. You can increase or decrease it but set it to more than 12 hours. Once done save the changes and the plugin will start building cache for preloading.
After enabling preloading, you will find your site loading much faster.
If you do not want cache status to be included under posts, you can disable it from the debug tab.