Wordpress SEO With SEOPRESS
How to Optimize Your Wordpress Blog for Search Engines with SEOPress
Wordpress SEO can be complex without a proper SEO plugin to manage all the aspects of SEO. It is one of the most critical aspects of managing your wordpress blog and growing your traffic faster. Website speed and user experience have also become crucial SEO factors and you need to focus on them also to find faster growth.
However, any Wordpress blog requires some basic optimizations that cannot be overlooked for proper crawling and indexation. There are several good SEO plugins that you can use to manage wordpress SEO including leading names like Yoast, AIOSEO and Rank Math.
.png)
SEOpress is relatively a newcomer and a less known player but has gained popularity swiftly as an all in one SEO solution. It is a simple, fast and well coded plugin that touts itself as white label on both ends. Despite being a simple plugin it includes all the compulsory SEO features and several advanced features that are generally included in only pro versions of the SEO plugins.
SEOpress also offers a pro version which is comparatively cheaper compared to the other leading SEO plugins with millions of installations. It has more than 200 K installations and an average 4.8 rating in the wordpress repository out of five.
In this post, we will show you how to install and configure the SEOpress SEO plugin and use it to derive the best results in terms of Wordpress search engine optimization.
The SEO press plugin comes with a configuration wizard that you can use for basic settings in wordpress. This configuration wizard will guide you through the critical basic SEO optimizations for your blog and setting meta robots tags for Posts, pages, archives and taxonomies. However, you must set it from the wordpress dashboard to properly optimize all the aspects of wordpress SEO for your blog.
SEOPress is also a beginner friendly SEO plugin and excellent for the users, which are in the process of learning wordpress and SEO. There are no complicated settings and you do not have to worry about bloat.
Installing SEOPress is easy and you can install it like you install any other plugin. Go to the wordpress plugin repository and search for SEOPress. Install and activate the plugin. Otherwise, you can download and upload the plugin to your wordpress installation manually and activate it.
Launch the configuration wizard for the basic initial setup. The configuration wizard will guide you through the basic steps to set up your website info and meta robots tags for posts, pages, archives and taxonomies. However, these things can also be set up directly from your wordpress dashboard. If you have been using another SEO plugin and are planning to switch to SEOPress, you can easily import metadata from your existing plugin using the built in importer.
Once you have installed the plugin, go to the SEOPress dashboard in the left sidebar in Wordpress admin page. When you open the dashboard, you will find all the features that you can manage using the SEOPress plugin listed here.
Here is a list of all the main SEOPress features:
Titles & metas
XML & HTML Sitemaps
Social networks
Google Analytics
Instant Indexing
Image SEO & Advanced Settings
Import/Export tools
Titles & Metas
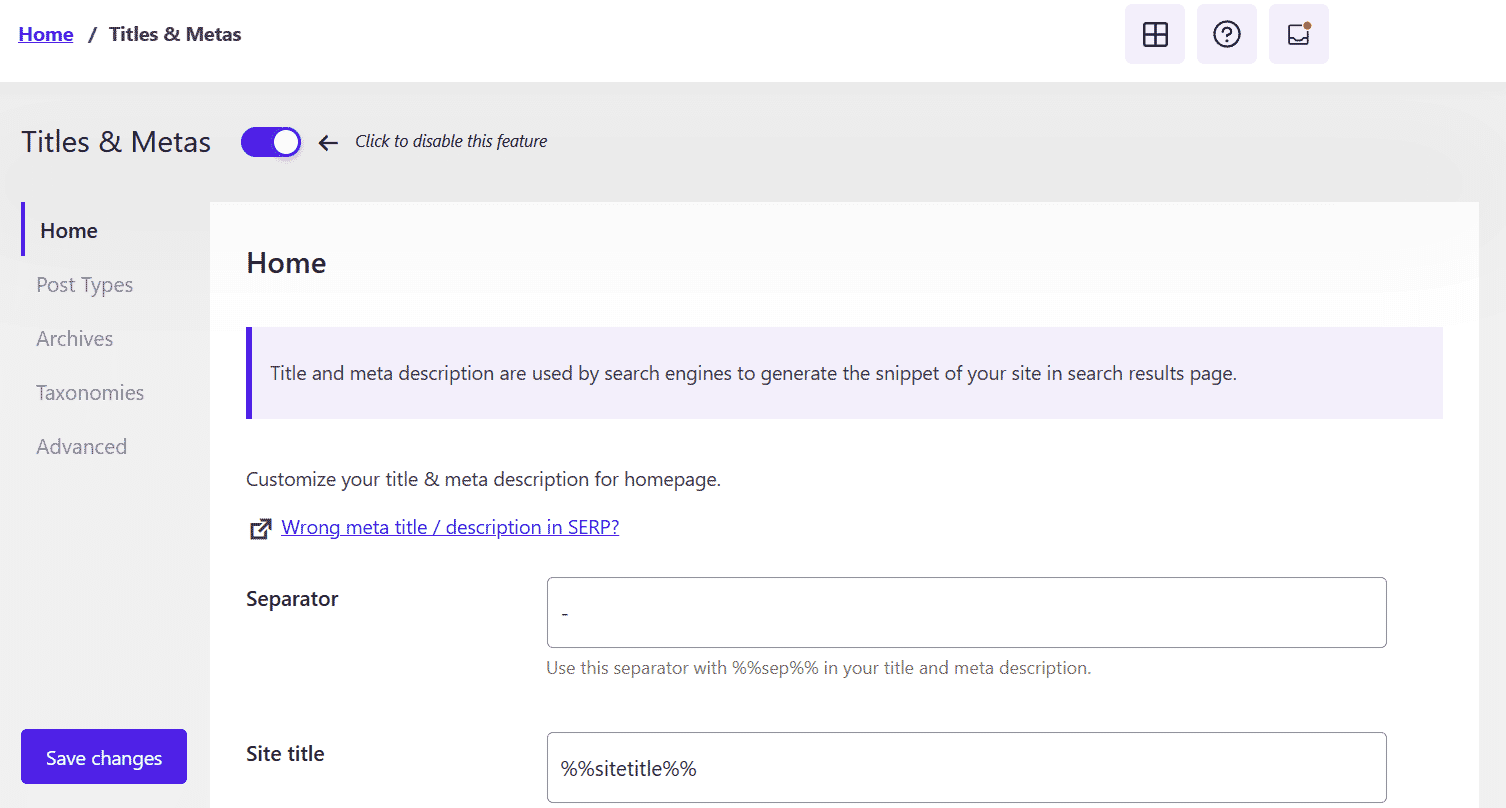
Search engine optimization begins from your content. While good content is at the core of your SEO, meta titles, descriptions and meta robots tags play a crucial role in getting your content indexed for being shown in search results. You need to make sure that your important posts and pages are visible and can be crawled and indexed by Google.
SEOPress can automatically generate titles and meta tags unless you want to set differently for individual posts. First, let us set the home page. In the case of the home page, the default settings provided by SEOPress are generally fine. However, instead of the tagline, you can use a more detailed and appropriate meta description for your website.
The default settings for the homepage are the site name for title and tagline for meta description. You would like to make the meta description a little more detailed for search engines and social media channels. Enter your own meta description for the homepage in the meta description box.
Posts and pages are required to be set as index and follow. In any case, you must not set the post types as no-index or no follow since that would prevent your posts from getting indexed by google or other search engines and served in search results.
The default meta settings for posts include the post title followed by a separator and sitename for SEO title. If you do not want your sitename included after the search results, you can remove the separator and site title variables from the meta title box. Leave the meta description box for posts as it is set. It includes the post excerpt for meta description by default. If you want, you can set post meta descriptions on individual posts. Otherwise, if you miss setting a meta description for a post, the plugin will use the excerpt for meta description. If you want you can also display the article published and modified time in search results with the help of the SEOPress plugin. You just need to check the respective box under the meta description box.
For your static pages like contact page and privacy policy page, the same settings like the posts would apply. However, if you like, you can disable the indexation of static pages by clicking the box next to do not display in search engine results. Otherwise, if you want the static pages to be indexed, you can continue with the default settings.
Archives titles and meta
Right under the post styles, you will find the title and meta settings for the archives. SEOPress includes settings for archive types including author archives, date archives, and search archives. These archives do not have to be indexed by google. So, you can set them as no index.
The author archives urls do not need to be indexed by Google since the author archives urls can cause index bloat and hurt crawl rate as well as rankings. The same is true about date archives and internal search archives.
If it is a single author blog, you can simply disable the author archives and date archives, which is generally a safer bait. You will find the box to disable author archives and date archives, under the respective meta description boxes. Both the author archive urls and date archive urls are set to no-index by default.
You will also need to set the search archives to noindex since the internal search urls do not need to be indexed by Google. This setting is also included under the meta description box for search archives. Check the box next to do not show in search results.
Categories and tags
Categories are used in Wordpress to divide posts in different categories based on content type. Similarly, you add tags to posts. While tags are less used than categories, they are also good for organizing posts. However, when it comes to indexation and search results, both these types of urls need to be kept out of Google index.
Please note that both the taxonomies can be set to no-index follow. These urls like the archive urls also do not need to be indexed by Google while they can be crawled by it. Noindexing these urls will ensure that they do not get indexed and cannot affect the search rankings of your posts and static pages.
As for both the taxonomies, just mark them as no-index by checking the box next to do not show in search results.
Advanced title and meta settings
At the bottom of the title and meta settings, you will find the advanced section. It contains some useful features that you may want to activate. This section allows you to change global settings for individual posts and pages.
However, you would not need to activate most of these features since they are used only when you want to keep your website out of the search results.
Scroll to the bottom, where you will find the options to set your paginated pages and attachment pages to no index. Check the boxes next to these options and leave the rest. SEOpress add the rel next/prev links to indicate paginated pages to google. However, as a precaution and to keep the paginated pages out of Google’s index, you can set them to no index.
The attachment pages can also cause index bloat and a decline in search rankings if they are indexed by Google. (Wordpress creates a separate url for each image you upload to the media gallery.) You can safely no index them. However, later, we are going to redirect them to post urls and so this will not have much of a difference.
Sitemaps
.png)
Every site needs a XML sitemap that can be crawled by Google so the search crawlers know which pages need to be indeed. You include all the pages that need to be indexed in the XML sitemap and exclude the ones that do not need to be indexed.
The XML sitemap is enabled by default in SEOPress and so is an image sitemap. However, you do not need an image sitemap for a blog, and so it is safe to disable the image sitemap since we are not going to get these pages indexed.
You do not need to enable the author sitemap either. However, if you want, you can also add an html sitemap to your website, which is not meant for web crawlers but for visitors. If you want, you can create a static page labeled sitemap and add an html sitemap to it using SEOPress html sitemap.
If you have marked the categories and tags as no index, they will be excluded from the sitemap. AT the bottom of the sitemaps section, you can find the settings for the html sitemap which will allow you to include or exclude particular posts and pages from your html sitemap and other features like disabling the publication date on the html sitemap page.
Social networks settings in SEOPress
The social network settings in SEOpress include the settings for knowledge graph as well as links to your social media accounts including Facebook, Twitter, Pinterest, LinkedIn, YouTube and Instagram accounts.
In the knowledge graph section enter if the website represents a person or an organization and the other details including name and logo. You can leave the contact fields empty unless you are running an online shop or the website is for your shop.
In the next section, add the links to your social media accounts and then move on to the Facebook open graph section where you can enter the facebook related details like app id, admin id, a default facebook image etc. The Facebook Open graph data is enabled by default.
The last part in the social network settings is related to twitter cars which is enabled by default. You only need to enter the size of image for your tweets like whether you want the default size or large images for Twitter cards.
Once done click save changes and your task is done.
Managing Analytics and GDPR compliance with SEOPress
The analytics section of SEOPress is mainly related to Google analytics. It also includes support for other analytics types including Matomo and Microsoft Clarity. Check the box next to enable google analytics and enter your GA4 measurement id for Google analytics to measure page views on your website . You are done and you don’t need to make any further changes. Just go to the advanced section where you can exclude particular user roles from measurement like administrator and logged in users.
The SEOPress plugin is GDPR compliant and can also help you add a GDPR cookie notice bar to your website. It is an exclusive feature that is not found in the other SEO plugins and comes included with the free version. The cookie bar is easy to set and most settings are easy to follow. So, you can easily customize the cookie bar according to your need and choice.
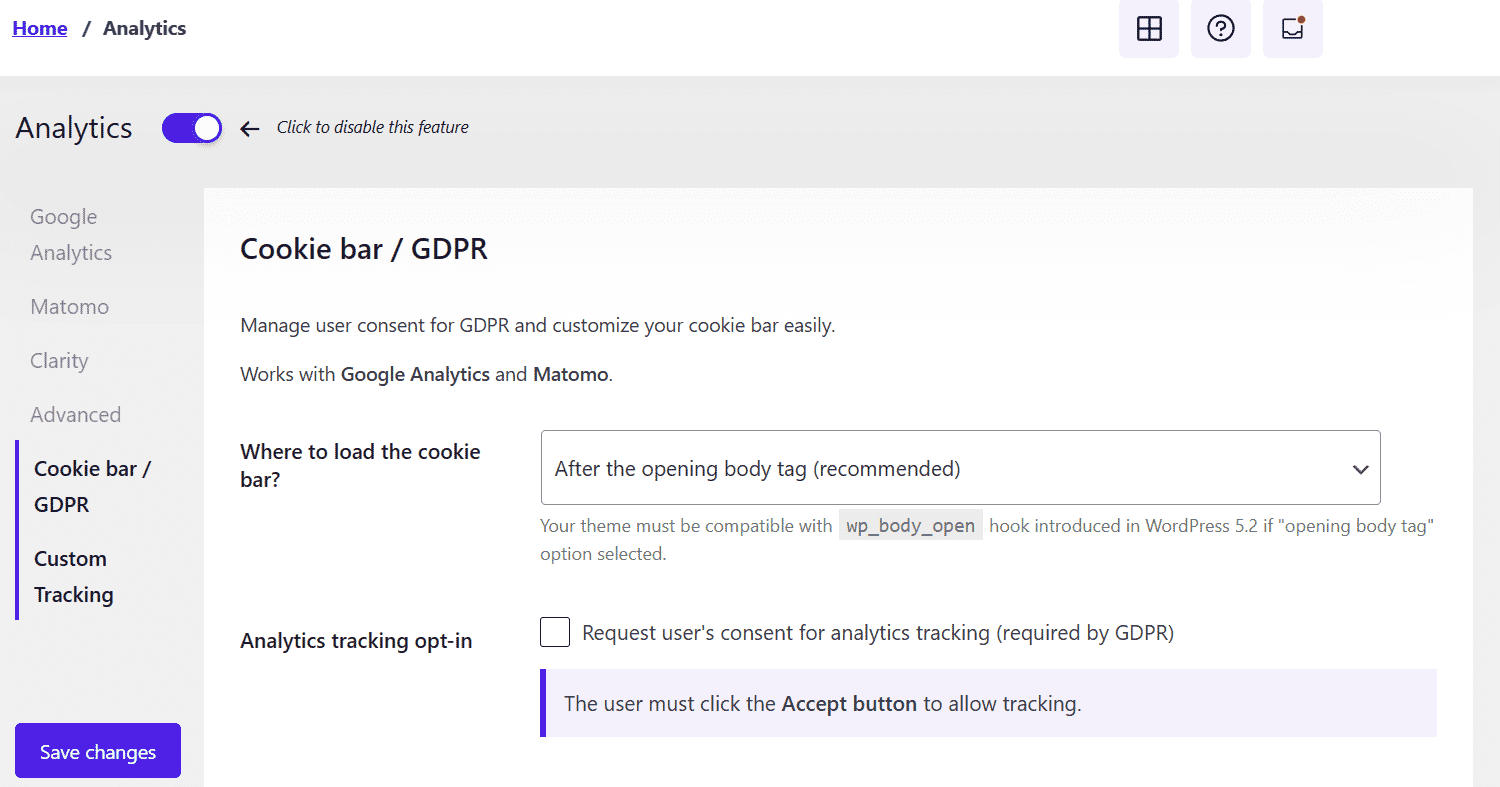
You can enter your own message for the cookie bar and customize its size, color and other features. After you have set the cookie bar, click on save changes. Then, clear the cache and check out the cookie notice on the front end.
If you want to insert any custom tracking codes or other code to the header, footer or body of your website, SEOPress also includes options to do so. These options are available at the bottom in the analytics section. You can use it to add the adsense code or any other code to your website.
Instant Indexing with SEOPress
.jpg)
SEOPress also has another great feature included which is instant indexing. It allows you to submit urls to Google and Bing for instant indexation. This feature is also included in the AIOSEO and Rank Math Seo plugins. Both Rank math and SEOPress have included this feature in their free versions.
However, you will need to register for the instant indexing API in google cloud before you can start using it. It’s not a lengthy or complicated process and you can generate your API keys easily from Google cloud. After generating the API key, add it to your SEOPress account and then you can submit urls for instant indexation through SEOPress.
The feature to automatically notify search engines is enabled by default in SEOPress.
SEOPress also includes another critical feature with its instant indexing feature which is also free. Suppose, you got some urls indexed by mistake or because of spam that you want removed from Google Index.
You can use the same instant indexation API to remove these urls which can be redirected to return a 404 or 410 status. In the checkbox next to which action to run for Google, check the remove urls box when you need to otherwise keep the update urls box checked.
SEOPress Advanced Settings
The advanced settings of SEOPress include the image SEO settings as well as other advanced settings that can be helpful for crawl optimization and for removing unnecessary features that can affect wordpress and seo performance negatively by causing duplicate content or other issues.
The image seo settings in SEOPress helps optimize and automate image seo. For example, you can automatically add alt text, caption, title and description to the image file. The default settings for image seo include image redirection to the parent url which you can keep enabled.
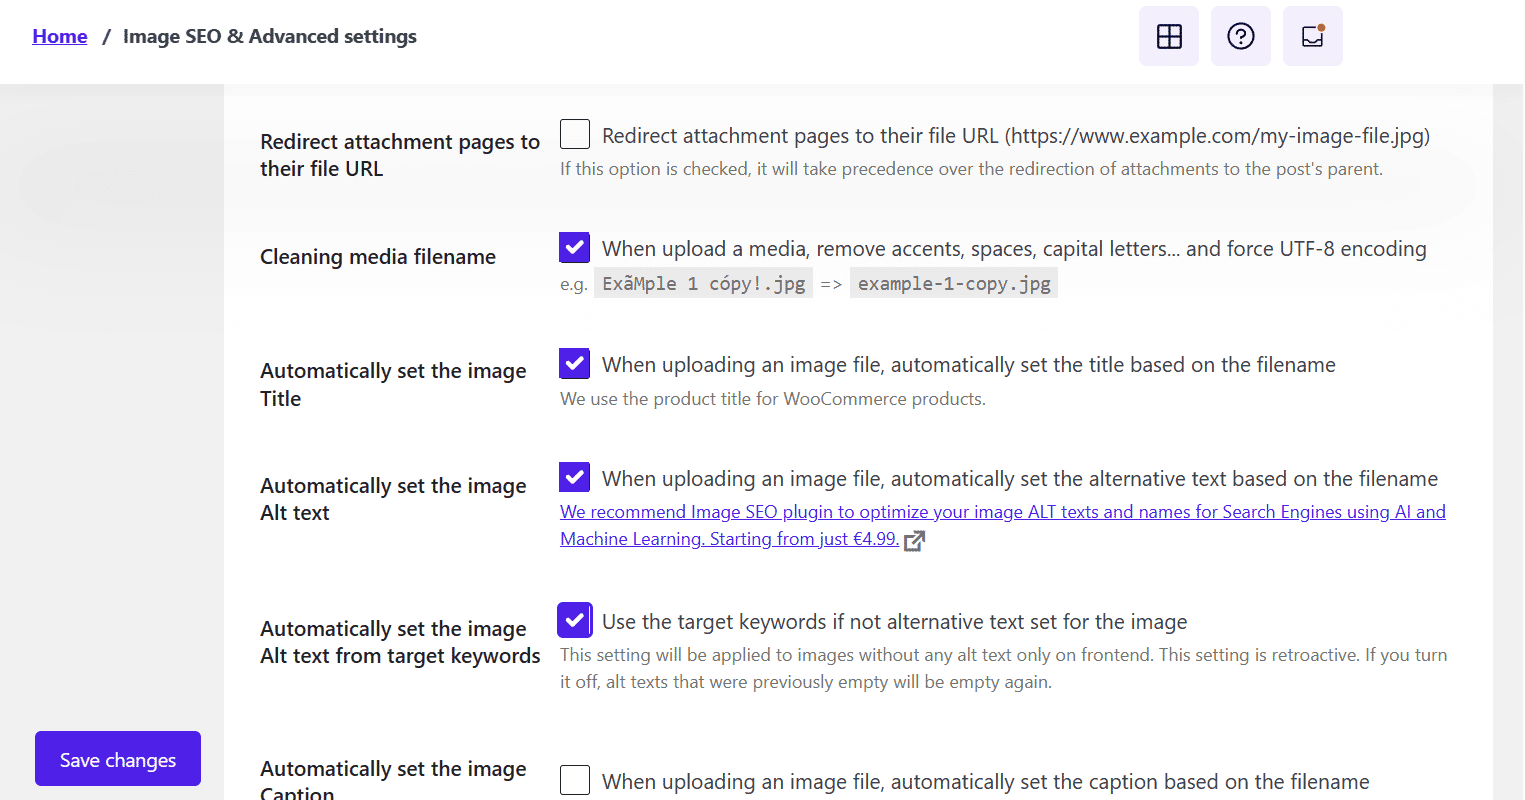
You can easily enable the other features by checking the boxes next to them.
Now, move to the advanced section under the ‘image seo’ section. This section allows you to remove the category slug from category urls like example.com/category/tech becomes example.com/tech. Here is a list of features you can safely enable for optimizing your wordpress blog.
Remove /category/ in url
Remove ?replytocom
Remove noreferrer link
Remove wordpress generator meta tag
Remove hentry post class
Remove author url from comments
Remove website field in comment form (to reduce spam)
Add nofollow noopener noreferrer rel attributes to the comments form link
Remove Wordpress shortlink metatag
Remove Windows Live Writer meta tag
Remove RSD meta tag
Remove oEmbed links
Remove Wordpress X pingback header
On the same page, you will find boxes to enter verification code for Google search console, bing and pinterest. You can submit your site to the google search console and add the verification code here.
At the end, you will find the features for managing plugin appearance and security. You do not need to change any unless you find a feature specifically essential. However, you can control which users are allowed to edit seo settings in the security section. If it is a blog that only you manage, then no need to change the settings.
The tools section at the end of the SEOPress settings includes the import and export tools as well as the button to reset the plugin settings.
You can use the import tool to import SEO data like meta descriptions from other SEO plugins. The reset button comes handy when you want to start afresh by deleting all database tables generated by the plugin.