Wordpress SEO With AIOSEO
How to use AIOSEO Plugin for Wordpress SEO
.png)
SEO has a critical role in blogging and also one of the most complex parts for the beginners. While Wordpress boasts of being the most seo friendly CMS, still there is a learning curve. However, the good news is that there are some SEO plugins that can make search engine optimization easy even for the beginners.
AIOSEO or All in One SEO is one of the most popular SEO plugins in the wordpress repository with more than three million active installations. It is a feature rich SEO plugin and a complete SEO solution. Counted among the most reliable SEO plugins, AIOSEO is used by several leading blogs for managing onsite SEO. The SEO plugin is feature rich and helps in managing all aspects of SEO from content optimization to internal linking, meta tags and descriptions as well as features to manage special pages and archives.
Installing and configuring the AIOSEO plugin is straightforward and simple. You can install it like you install any other plugin and start optimizing your blog. In this guide, we will discuss how to use the AIOSEO plugin for optimizing your wordpress blog and growing your traffic. First login to your wordpress dashboard and go to plugins. Click on Add new and search for AIOSEO. Install the plugin and activate it.
When you install the AIOSEO plugin for the first time on your wordpress blog, it runs a quick configuration wizard that will help you run a basic setup of the plugin including home page settings and social links. You can run the quick configuration wizard and set the plugin or skip the part and get directly to the dashboard to manually set it up. When running the quick configuration wizard, answer the questions as you seem fit like if your website is a personal blog or online store and how would you like your homepage to appear in the search results.
.png)
There are several pro features included in the quick configuration wizard and unless you are planning to buy the pro version of the plugin, you can skip those features. For beginners, the free features of the AIOSEO plugin are generally sufficient. Even if you have been running a blog lately and want to switch to the AIOSEO plugin, you can easily import settings from the other plugins directly with one click.
AIOSEO General Settings
.webp)
Once you have installed and activated the plugin, its settings are visible on the wordpress dashboard in the left sidebar. The general settings include settings for webmaster tools and a few advanced settings. If you have bought the pro version, you can enter your license key in the general settings. Following that you can enter your Google Search Console verification code and other similar verification codes like Bing and Pinterest. If you want breadcrumbs enabled on your blog, which are enabled by default just keep the default settings. Otherwise you can disable breadcrumbs from general settings. You can also use the default advanced settings among the general settings. If you need, there is the option to disable the AIOSEO Columns in the posts section on the Wordpress dashboard that shows the seo score for specific posts. It can be done from the advanced settings.
AIOSEO Search Appearance Settings
.png)
The global settings in the Search Appearance section of AIOSEO settings include the settings for AIOSEO homepage. For the site title settings, you can use the site title tag and remove the rest unless you also want the tagline included in the headline in search results. Use the tagline for meta description or enter a description for your website’s homepage. In the knowledge graph section, you can enter the name of your website and alternate website name and whether it represents a person or an organization. For Local SEO settings (not required for a blog), you will need the pro version where you can insert your local address and other business related information. At the end, click on the save changes button at the bottom.
On the search appearance page, you will also find the settings for posts and pages. Click on the content types tab and start optimizing. In this section, you can just use the default settings since the posts and pages are set to be indexed by Google. It means Google will crawl and index the posts and static pages on your blog. In the posts section, you can use the post title followed by the site name for the SEO title.

The Schema markup settings are included in the pro version where you can manually edit the schema for posts and pages. You can leave this section and the custom fields section unless you are using the pro version. Now, go to the advanced settings for posts. Here you can change the default settings. However, since you want your posts to be indexed by Google, you can continue with the default global settings for posts and pages both.
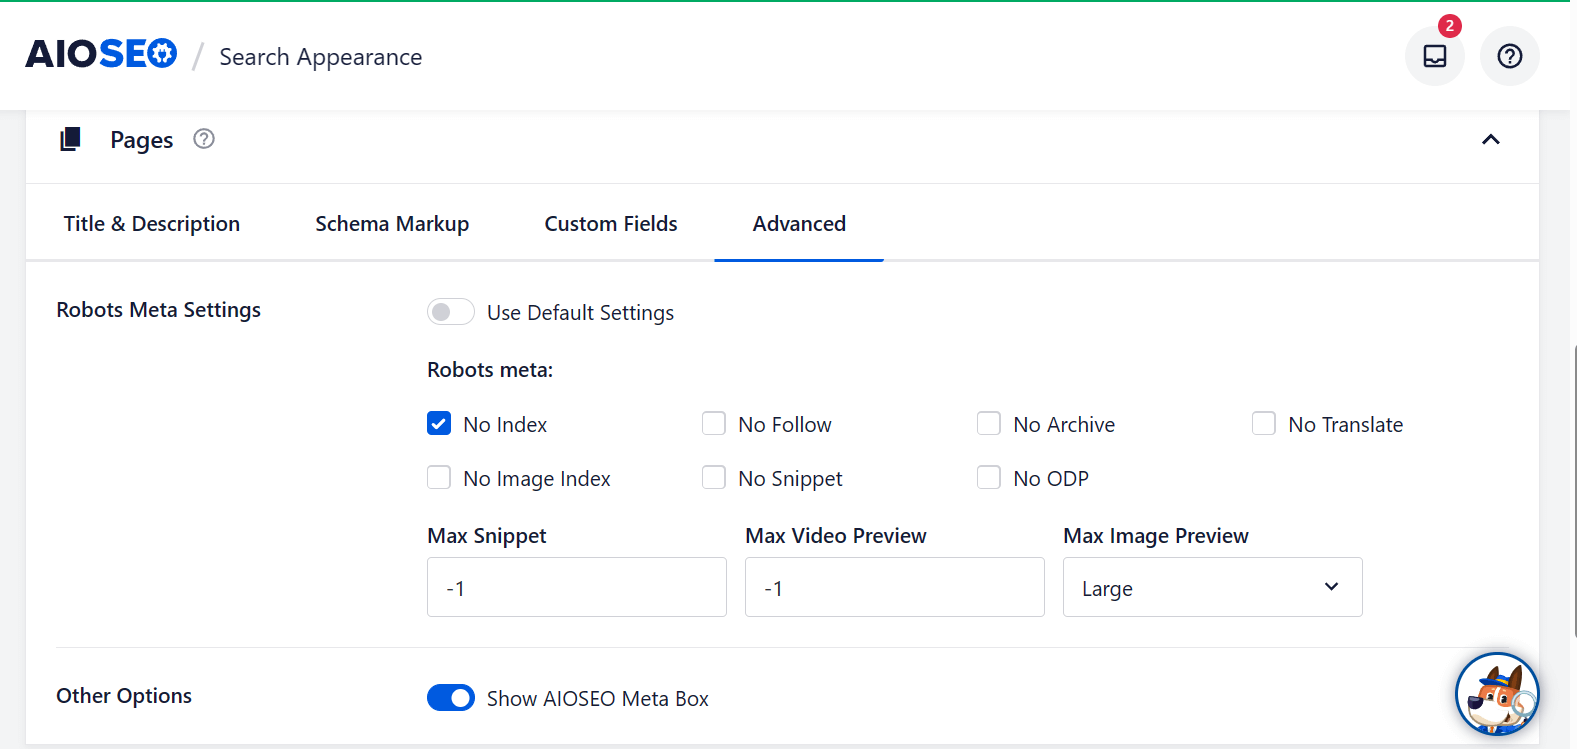
Suppose you want to noindex static pages on your website, you can switch off the default robots meta settings which will open the settings to change robots meta. Now, you can mark static pages as no index or nonindex and nofollow. However, it is recommended to use the default global Robots meta settings for Posts and pages so they can be indexed by google and show up in searches. If you want you can set individual posts or static pages to noindex from the post or page editor itself.
The pro version of the plugin also includes a special feature called index now that can be used for getting urls indexed faster by google.
A note for beginners: No index robots meta tags are used to tell googlebot that these urls do nto need to be indexed and must not be shown in search results. Additionally, marking a url as no follow will also ensure that these urls are not crawled as often and the links found through those urls not indexed. Use a sitemap to tell google which urls need to be indexed.
Categories and Tags
Dealing with the taxonomies is slightly tricky. It is because sometimes users and especially new users do not know whether to index or noindex the category and tag archives. You surely do not need to get your archive urls indexed. It is because while users can directly visit the urls they need to, category and tag urls can cause indexation bloat, which can be a really bitter problem to resolve.
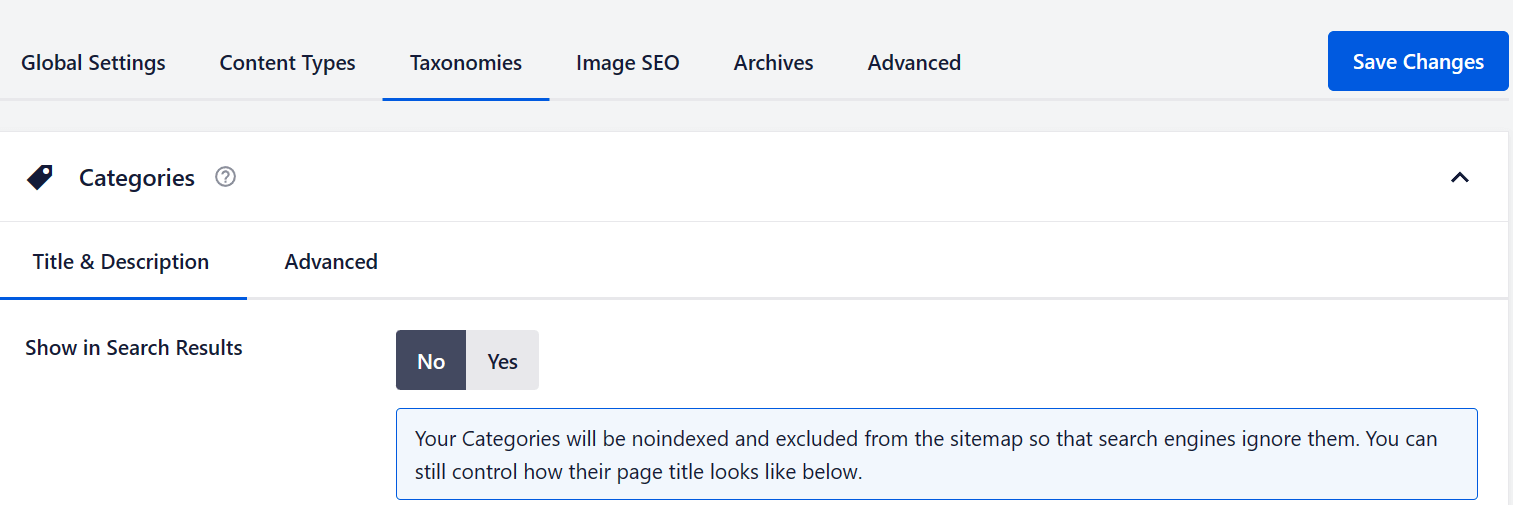
By default the taxonomy urls are marked as to be indexed. However, we are going to change that. Switch off the show in search results button for the taxonomy archives including categories and tags. It will also exclude the category and tag urls from the sitemap. Apart from your post urls and static pages, you wouldn’t want anything else getting indexed by Google.
Image SEO
Image SEO is a very important part of Wordpress seo. Wordpress creates a unique url for every image that you upload to it. However, these urls do not have to be indexed otherwise they would cause your rankings to decline. This problem is also known as index bloat.
To prevent the wordpress image urls from being indexed, users can redirect the urls to the attachment itself. An even safer bait is to redirect the image url to the post itself. AIOSEO provides these settings in the image SEO section where you can redirect the image urls to the attachment or the post.
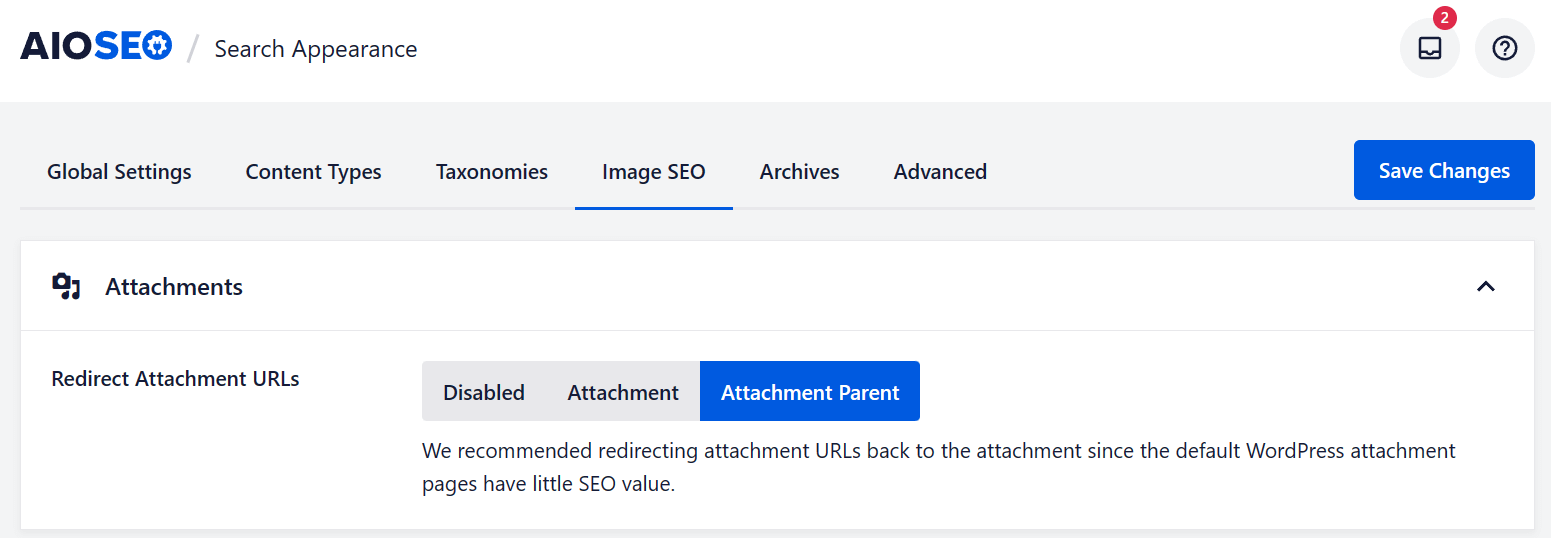
In the Image SEO section in search appearance, you can select one of the two or disable image redirects altogether. However, you must use the image redirects to avoid getting the urls indexed by google. If you want to check out which urls are indexed by google, please look into the search console data where you will find the urls indexed or not indexed because they are marked as no index.
The google search console is a very important tool for Wordpress SEO. You should submit your site to the search console to receive indexation data in detail.
Other Archives settings
Apart from the categories and tags, Wordpress also creates author archives and date archives as well as format based archives. You do not want to get the author archive urls or date archive urls indexed by Google and show they must be disabled. Again, if these urls get indexed, they will cause index bloat and hurt rankings. So, the safest bait is to disable them or no index them.
You can no index these urls by toggling the switch next to ‘show in search results’ off. Do it for both the author archives and date archives. You can mark these archives as no index and no follow in the advanced settings part for the archives.
On the same page, you will see the settings for search pages. The internal search urls in wordpress are set to no index by default and you must leave it that way. Internal search urls should not be indexed by Google and apart from marking them as no index, users can also add rule in robots.txt to prevent their crawling by Google.
While these urls will not provide any SEO value, it can also help prevent search spam by hackers. As in the case of other archives, these urls can also cause index bloat if they get indexed.
Dealing with feeds, query strings and paginated pages
In the advanced section of search appearance,you will find the settings to noindex the paginated pages. Paginated pages are pages like example.com/page/6 and so on. These urls do not need to be indexed by google and so can be safely noindexed.
At the top in the advanced settings, you will find the global robots meta. Toggle the switch next to global meta to use default settings off. You will see that the paginated pages are noindexed and marked no follow. The RSS feeds are also marked as no index.
The settings for query strings, and disabling feeds can be found in the advanced section of the search appearance settings. Wordpress feeds are of no use if you are not planning to generate subscriptions. Users can directly read the posts and it will also prevent content scraping. So, it is good to either disable them altogether or noindex them.
Generally, it is sufficient to mark the global feed links as no index. However, the other types of feeds like comment feeds, attachment feeds and search feeds are disabled by default in AIOSEO advanced settings. You can also disable author RSS feeds if you are not going to use subscriptions on your blog. If it is a single author site, you can safely disable the author RSS feed and the global RSS feed will be enough for subscriptions.
Sitemap feature of AISEO
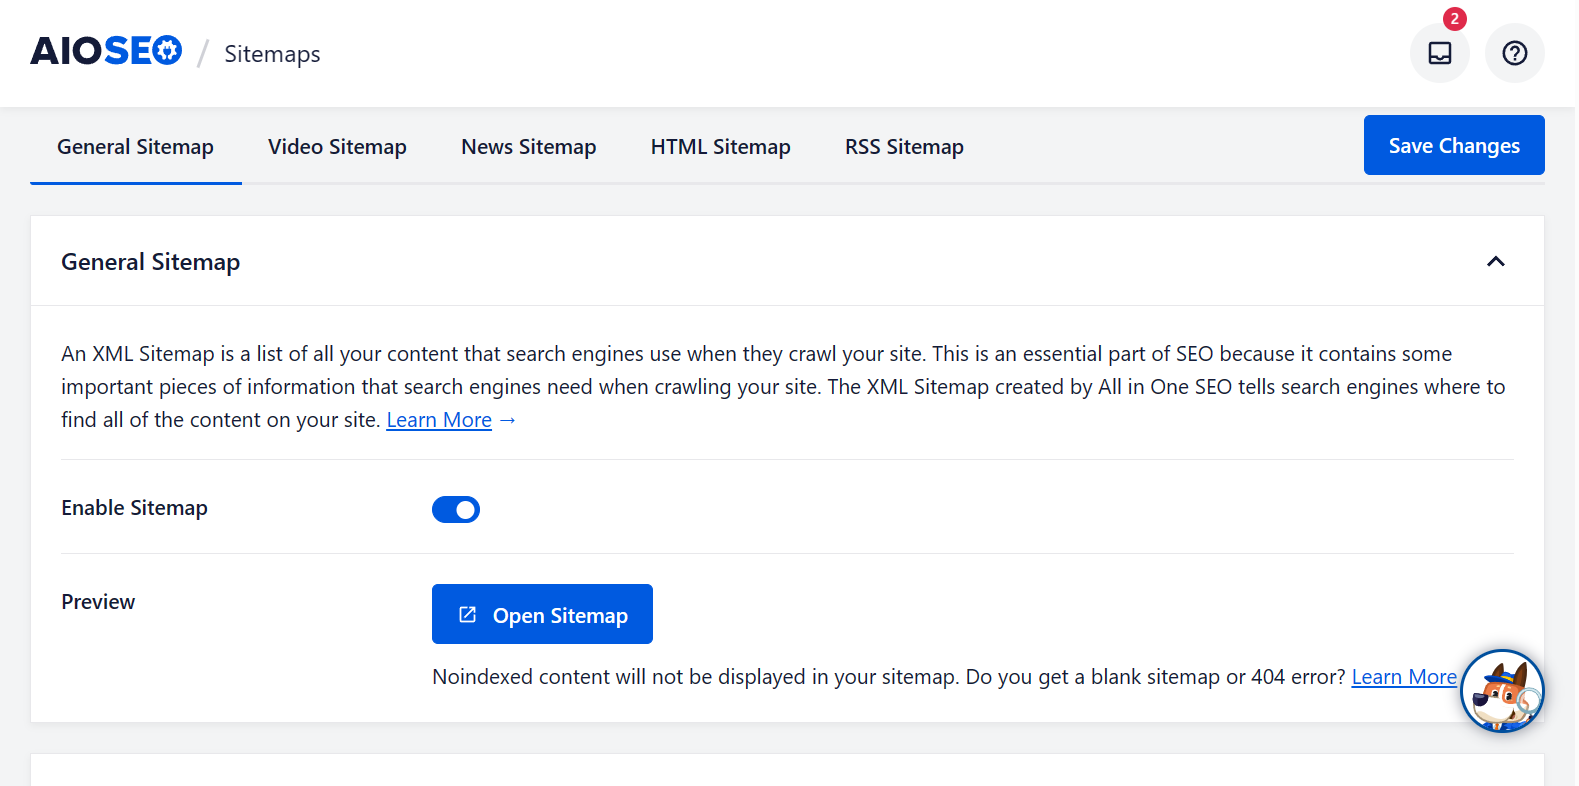
A sitemap is important for every website to tell crawlers about the urls that need to be indexed. Every SEO plugin includes this feature. You will find the Sitemap settings under the social network settings in AIOSEO.
On the sitemap settings page, you can change the number of Links to be included in a sitemap. The default value is 1000 and you wouldn’t need to increase the value if you are just starting out.
You only need to include your posts and static pages in the sitemap. So, disable the taxonomies to exclude them from being included in sitemaps since you have marked them as no index and these urls do not need to be submitted to Google for indexation. The date archive and author archive sitemaps are disabled by default and you can continue with the default settings.
In the advanced sections on the sitemap page, you will find the exclusion settings where you can exclude any posts and pages you do not want indexed.
Turn on the button next to exclude images from the sitemap in the advanced section.
The video sitemap and news sitemap features are available with the pro version of the AIOSEO plugin. If you do not need an html sitemap, you can disable this feature unless you want your users to see an html sitemap.
To enable the html sitemap, create a static page in wordpress titled sitemap and enter the url in the html sitemap settings of AIOSEO. Disable the RSS feeds sitemap at the end in the Sitemap settings.
The links assistant, redirects and local seo are pro features which you can use after buying a license. You do not need the local seo if you are not an online shop.
SEO Analysis and tools
The SEO analysis feature of AIOSEO can help you learn how well optimized your site is for search rankings. To conduct the analysis you will need to create a free account with AIOSEO and then connect the account.
In the tools section of AIOSEO settings, you will find the settings to edit the robots.txt and .htaccess files.
If you have been using another SEO plugin previously, you can import its settings into AIOSEO using the import tool.
Managing post meta descriptions and meta titles with AIOSEO
The meta descriptions for individual posts and meta titles can be set on the posts. The AIOSEO settings for individual posts including meta descriptions and canonical urls are available below the posts. You can add nice meta descriptions for each post under the posts in the meta description box.
Otherwise, AIOSEO will use the excerpt for meta description automatically. The general format of SEO title for individual posts is the post title plus separator followed by site name. However, you can change it for individual posts if you like and set a different SEO title for the posts.
Apart from under the posts, these settings can also be found in the sidebar to the right of the post editor. If you want to change the canonical url for a post, you can do it in the advanced section of AIOSEO settings which are found below individual posts.
These were the main settings of the AIOSEO free version. You can get additional features with the pro version. However, for new blogs, the free version is generally sufficient.
SUGGESTED READING