W3TC Settings Wordpress
%20(1).webp)
W3 Total Cache Settings for Wordpress
W3 Total Cache or W3TC is among the most used caching plugins in the wordpress repository with a 4.4 rating and more than one million active installations.
The plugin is popular because of the extensive caching and speed features it includes. However, its large number of features may sometimes complicate things for the new users. Therefore, knowing the right settings will help you speed up and secure your site.
If you are a new user and want to avoid all the complicated setup but just want a simple plugin with all the speed benefits then you must go for a premium plugin like WP Rocket. W3TC comes in both free and pro versions. For a simple blog, its free version is generally sufficient for performance optimization and speeding up the website. To achieve the fullest benefits, you must Zend opcache and object cache like Redis or memcached enabled at server level. While some hosts like Cloudways provide free Object caching and Varnish caching, in other cases, you can ask your host or install it yourself if you are using a dedicated server.
Redis can help improve wordpress speed significantly. However, if your host does not offer redis, you can also go for memcached.
Install and Activate the Plugin
To install the plugin, just go to the Wordpress plugin repository from the Wordpress dashboard and then search for W3TC. Click on Install to install the plugin and then activate it.
After activation, W3TC will launch its configuration wizard. If you want, you can skip this wizard and set it up yourself.
However, if you are a new user and want to understand things better before proceeding, then you can use the wizard to learn which caching mode will offer the fastest speed. You can test page caching to learn which one of the available caching methods is best for it. However, if you plan to use Object caching like redis or Memcached on your server, you can skip this wizard since redis offers better performance. If you cannot use Redis, you can still use Memcached in its place.
You can skip the wizard and go to general settings and configure the plugin for use.
W3TC General Settings
The W3TC General settings includes the basic settings for all types of caching and minification including page cache browser cache, database cache and object cache. These caches can be optimized further from their respective pages.
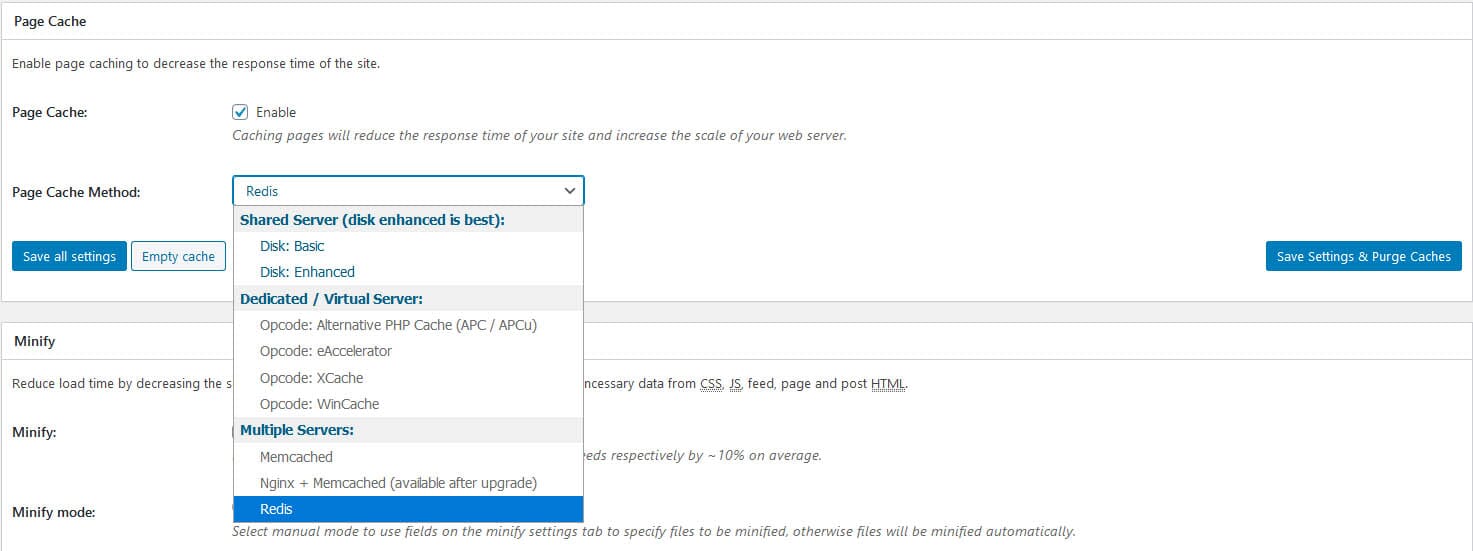
Page Caching
You will find page caching included at the top in the general settings. It can significantly improve page load times for blogs that do not need dynamic content on each page load. To enable page caching, just tick the check box and select the page caching method. The default page caching method is disk enhanced, which you can continue to use if you do not have redis or memcached enabled at server level. Suppose you have Redis enabled at the server level, then from the drop down menu for caching method, select Redis. Otherwise, Disk Enhanced method must work fine for page caching.
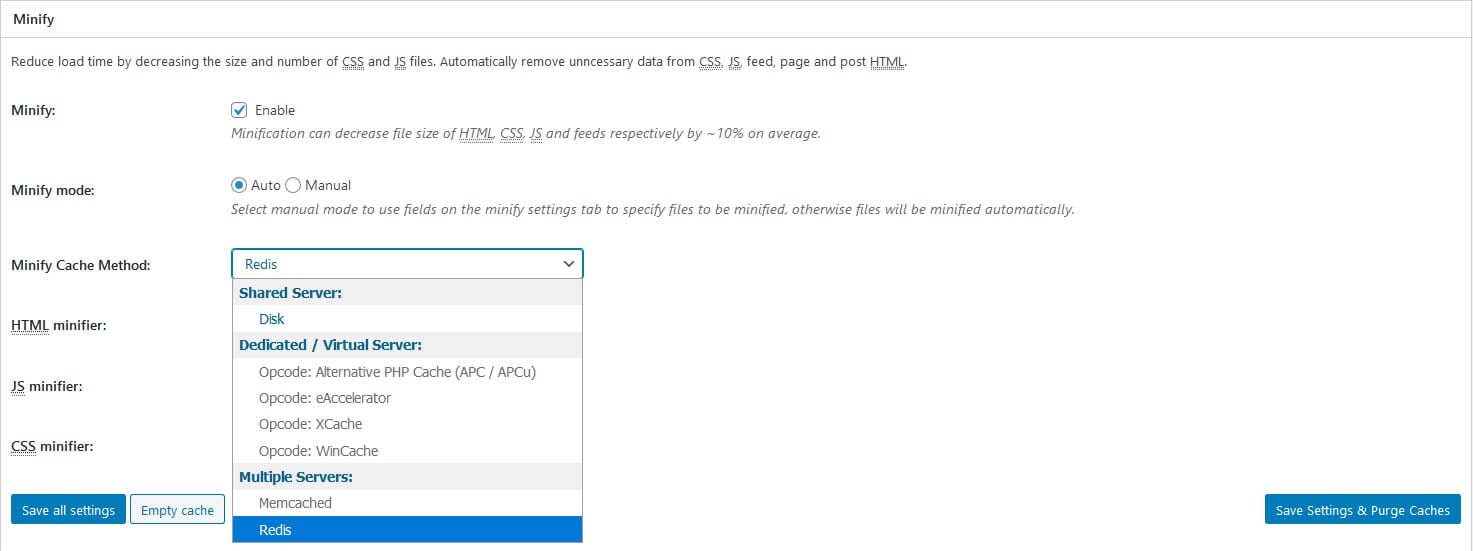
Minify Settings W3TC
Minification is a somewhat tricky process when setting with W3TC. If you are using Cloudflare on your site, you can leave W3TC minification disabled. Otherwise, use it in auto mode and use redis or memcached as the minification method. You can also test with manual settings. However, please check on the front end that it does not break anything. If setting manually the default minification method generally works well. For html, you can use the default minification or HTML tidy. Similarly, W#TC offers several options for minifying CSS and JS and you can select the one that works from the dropdown list.
Opcode Cache W3TC
Opcode caching is a powerful caching method that can significantly improve load times for your website or blog. It must be enabled already on your server. Otherwise, you will find the settings for OPcode Cache disabled in W3TC.
Opcode cache caches precompiled PHP code and thus eliminates the need for repetitive php code interpretation. This can significantly improve loading times since Wordpress is made from Php mainly.
Database cache W3TC
Database cache stores the frequently accessed database queries in memory, which reduces the need for repetitive interaction with the database and can improve load times. However, in most cases, it is recommended to use either the database cache or the object cache. You should test if database caching works fine on your website, since it can also sometimes cause higher CPU usage.
Object Caching W3TC
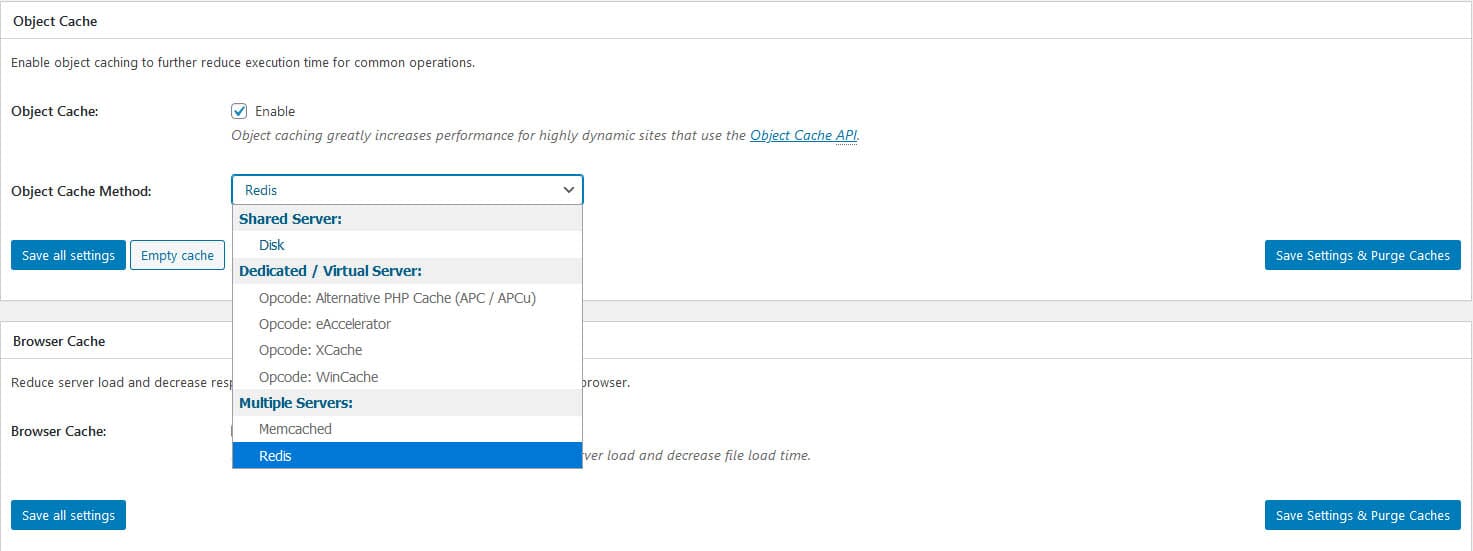
Object caching is recommended for websites built using Wordpress and setting object caching with W3TC is easy. You only need to have object cache enabled at your server level. So, if you have Redis enabled on your server, use redis for database caching or memcached. Otherwise, you can use Disk based caching for Object caching. Persistent object caching is a lot more effective compared to the traditional caching methods. Therefore, using Redis or memcached will significantly boost performance for your Wordpress website.
Browser Cache W3TC
Browser caching also helps with faster load times and can help provide your users a lot smoother browsing experience. It instructs the visitors’ browsers to cache pages and reload them when a visitor browses the website again. We browsers will store images, css and js, so that the subsequent visits by these users do not need downloading these files again leading to faster load times.
W3TC CDN
If you are planning to use a CDN on your website, you must enable it in general settings of W3 total cache. W3TC supports every type of CDN and there are preconfigured settings for several leading CDN brands like Cloudfront, Stackpath and others. If you do not find your CDN listed, then select Generic Mirror for your CDN. We can further optimize these settings on the CDN page but right now, we will need to enable it for use on the website.
Varnish Caching
W3TC also includes a feature to purge varnish cache. However, you will need to have Varnish installed on your server. Some hosts offer free Varnish caching with hosting. If you are on a dedicated server, you can install varnish and add the ips in W3TC to enable purging of cache.
The rest of the settings in General Settings in W3TC can be left as default except for the user experience settings which include image lazy loading, and removal of unessential scripts. If you are not using another plugin for lazy loading images, this feature can also help you improve your site speed. In the user experience, you can also disable wordpress emojis and oembed scripts. However, be cautious when disabling jquery-migrate since it might break a few things at the front end. So, you will need to check at the front end after enabling this setting and if it breaks css or js, do not enable the feature.
The user statistics settings are a pro feature and you will need to buy a pro license, which comes for $99. You can enter the licenses key on the general settings page to enjoy the pro features.
Page cache with W3TC
In the next section after general settings, you can configure page caching behavior for your wordpress site. In the general section, you will find configurations for the pages you want to cache or exclude from cache.
Cache Front Page:
If you have a simple blog, you must enable this feature since the home page is among the most important pages on a blog. However, in some cases, where the home page is fast changing or you need to have dynamic content on the front page, you might not need to enable it. If its an ecommerce site or in other cases where dynamic content on home page is compulsory, you might not want to cache the front page. However, if your home page lists only the latest posts or if you have another static page that does not change so often, you may want to enable the feature. Enable it for your wordpress blog since you want your homepage to load faster.
Caching Feeds
Feeds are not as popular anymore and in several cases, people like to disable the wordpress feed. It is up to you whether you want to enable or disable this feature. However, the most important focus of your caching strategy are the home page and post pages. Based on that, you can decide if you need this feature or not. It will not have any direct impact on the loading speed of your website, its homepage or posts pages.
Cache SSL Requests This feature allows for unique caching of the ssl requests. However, if your site has ssl enabled by default or it is only available on https, you would not need this feature. If your site is available on both http and https, you would like to enable this feature. However, most sites force ssl redirection, and the use of this feature in that case is not required.
Cache urls with query string variables
Caching the urls with query strings is not recommended or compulsory. Especially, in the case of wordpress blogs, you do not need to enable this feature since it will cache search pages which is not necessary. Unless there are specific query strings that are required to be cached, you must keep this feature disabled.
Cache 404 pages
Caching 404 pages can be risky. The 404 status denotes that these pages were not found. However, if you cache 404 pages, they will throw a 200 status and can be indexed by Google. So, don’t enable this feature. Apart from that, it does not offer any real speed benefits and on the contrary can cause indexing related issues.
Don’t cache pages for logged in users
It is recommended to enable this feature since it will reduce the burden on the server and logged in users will be able to see dynamic content. It means logged in users would not see a cached version and the updates would be instantly visible to them.
Don’t cache pages for the following user roles
If you are already using the previous feature which is to not cache pages for the logged in users, you will not need to enable this feature. Otherwise, you can specifically exclude certain user roles from caching. You can specify which users must see dynamic instead of cached content.
Cache Alias hostnames
Leave this feature disabled. It is useful when you have the same content accessible from more than one domain names. However, it is not the case generally so leave this feature disabled.
Cache Preload
The cache preload feature allows you to preload cached pages and serve pages faster to users. This feature can be used to provide your users with a faster experience. However, it is also a CPU intensive process and therefore, if you have limited server resources you can leave this feature disabled.
If you want to use the preload feature, then specify the preload interval and add a sitemap. The plugin will crawl the sitemap to preload the pages. Add your sitemap url in the box for sitemaps.
Purge Policy
The W3TC purge policy allows you to specify the pages which need to be purged when you publish a new post or other changes like new comments are posted on the website. You should purge the homepage, and post pages. However, you can also specify additional pages like the feeds and archives if you want them purged including the author archives and dated archives. If you are using author archives on your blog, you can select to purge them after updates. Most websites now do not use date archives and you can leave them disabled.
Rest API caching
The Rest API caching is a pro feature that can be used to cache the wordpress rest API. However, you do not generally need this feature unless you are using headless wordpress. Unless you know that there is a need to enable the feature, you can leave it disabled.
Advanced settings
The advanced section of page cache includes several features that are meant mainly for the advanced users. So, unless you know what these features mean and if you really need them, you must not touch them.
In this section, you can specify the pages that must never be cached including specific authors, categories and tags. You can also specify rejected user agents. In most cases, you will not need to touch these features. However, if there are certain query strings or pages that need to be excluded from the cache list, you can specify them here.
W3TC Minify Settings
Minification with W3TC can be slightly complex and in some cases may require adequate testing to arrive at appropriate results. Unless you have the necessary technical knowledge to set these configurations manually, you can go for the automatic settings.
Rewrite url structure
Leave this setting enabled so that css and js embeddings have pretty urls instead of query strings.
Disable minify for logged in users
Leave this option disabled if you have enough server resources. Otherwise, you can specify to not serve the logged in users with minified versions. Keep minify error notifications disabled.
html and xml
Enable html minification settings. Inline css and js minifications. Disable minification of feeds. Feeds are not used commonly now a days so you can disable minification of feeds.
Do not enable line break removal since in some cases it may lead to pages not loading properly.
JS minification
Enable JS minification with minification method combine and minify. Use the default settings ‘blocking’ in minify engine settings. If you have selected manual instead of auto, you will need to do a little testing to arrive on the right settings.
You must test before using the non blocking methods to make JS non render blocking with W3TC. While in some cases, making JS non render blocking will lead to improved performance, it is not compatible with all types of code. It is why you will need to test to see the results. W3TC includes features to make javascript non render blocking using async or defer.
Again line break removal is not suggested since it may break things at the front end.
HTTP2 push can work if your server has the feature enabled. However, it can also cause errors in some cases. So, whether in the case of CSS or JS minification, you will need to do adequate testing with this feature.
CSS Minification
Enable CSS minification for your website using W3TC with the default method - combine and minify. Eliminating render blocking css is a pro feature that can be enabled once you have applied a pro license. It can however, improve paint times and will help load pages faster.
@import handling : None
HTTP2 Push: may not be ideal in all situations and therefore it is recommended to test the feature before enabling it.
Advanced Minification settings
In the advanced minification settings you can add the pages and files that have to be excluded from minification. Use this feature if you need it or leave it. In the advanced section, you can also specify external scripts that must be minified.
Database Cache with W3TC
The database caching feature in W3TC is used to cache database queries and render pages faster to users. It helps avoid repeated trips to the database, which results in faster loading times. However, you do not need to use both database caching and object caching together. So, if you are planning to use Object caching, you can leave database caching disabled. For database caching method, the plugin will follow the method specified in the general settings.
If you have enabled database caching in general settings then set the following configurations on the database cache page.
In the general settings, check the box to not cache queries for the logged in users. You will not need to make any changes in the advanced section unless there are specific query terms or pages that you do not want to be cached.
Object Cache with W3TC
Object caching is important and recommended for Wordpress. You can use object caching with Redis for the best results and enjoy solid improvement in loading speed. The plugin will follow the object caching method specified in the general settings. Persistent object caching is known to significantly improve performance and load times in Wordpress.
In case of object caching, the default settings are generally fine for most websites and you will not need to make any changes to the configurations. If you have enabled object caching and selected the object caching method in the general settings, that’s all to it.
Advanced In the advanced section, you will find the following settings and you can use the default configurations on your website.
Maximum lifetime of cache objects : 180 seconds
Garbage collection interval: 3600 seconds.
Global groups: This settings allows you to set caching groups that can be used in a network or multisite mode. However, you do not need to make any changes here.
Non persistent groups: this setting allows you to add groups that can be excluded from object caching. There is no need to make any changes here either.
Enable caching for wp admin requests: No need to enable this feature since while it can improve the loading times of wp-admin dashboard, it can also cause errors.
Store transients in database: Leave this feature enabled.
Browser caching with W3TC
Browser caching is recommended to be used in almost all situations. It encourages browsers to store a local copy of assets and load it when the user visits the page. It leads to faster loading of the web page since the browser is loading a local copy of the website assets. It will also reduce the burden on your server. Configuring browser caching with W3TC is very easy. Follow the guidelines below to configure browser caching with W3TC.
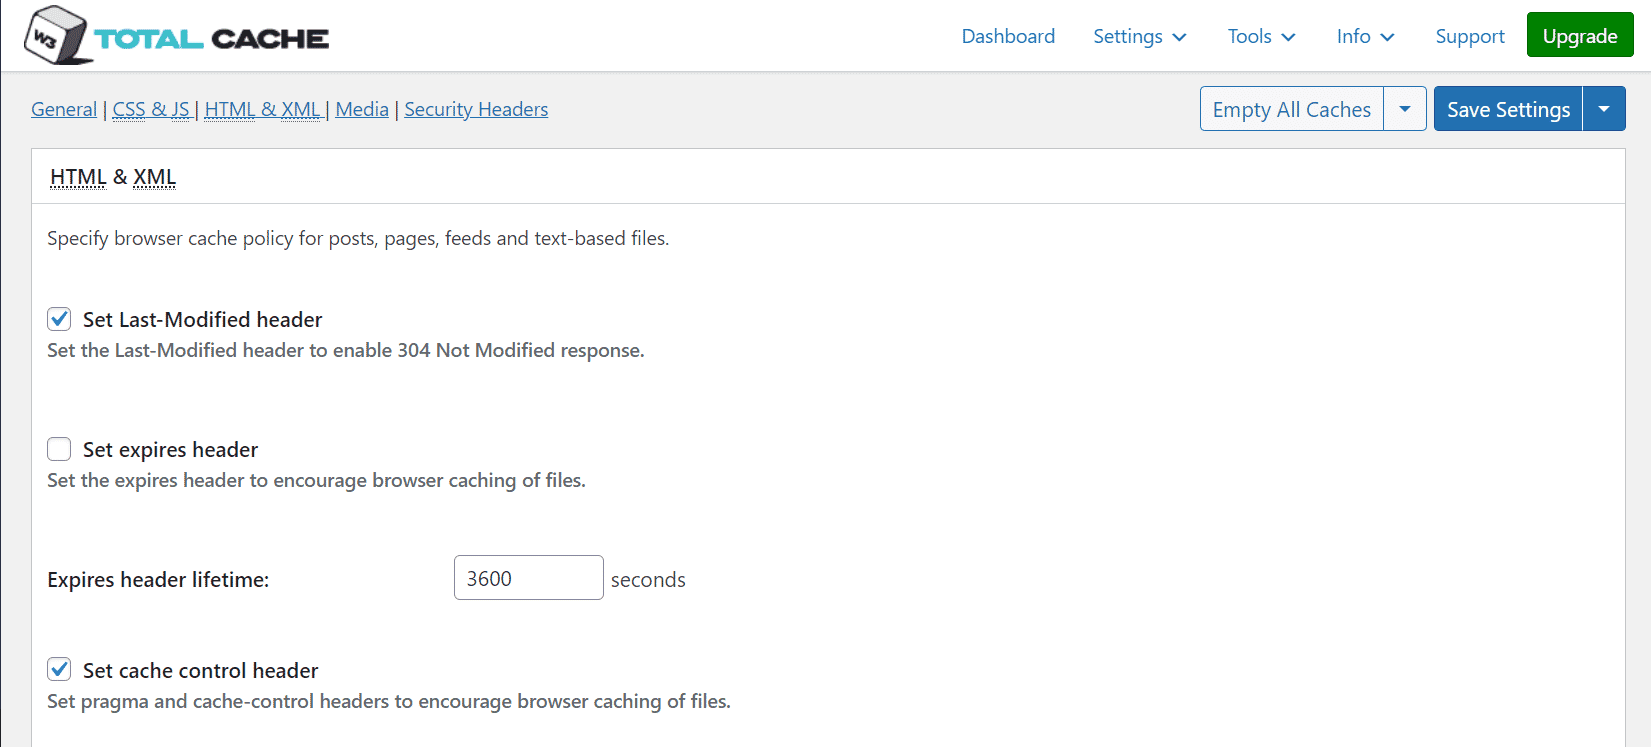
Set last modified header
Enable this setting. This header includes information about when a resource was last modified. It will help determine if the resource stored is the same. This setting is also used as a fall back for Etag header.
Set Expires header
Set expires header on in the General settings and for CSS and JS but do not enable the settings for html and xml files.
Set Cache Control header
Enable this setting for all types of files. It encourages browsers to cache files. The cache control header specifies directives for caching mechanisms in both requests and responses.
Set Entity Tag (ETag)
It is recommended to enable this setting since it allows for more efficient caching and saves bnandwidth.
Set W3 Total Cache Header
Leave this disabled.
Enable HTTP Compression (Gzip and Brotli)
It is recommended to enable http compression on your website since compressed files will download faster leading to faster loading of web pages. It reduces bandwidth consumption and the load on your server. Usually compression is an important first step towards improving Wordpress site speed.
Enabling GZIP is easy and if you have not already enabled it on your server, you can enable it using W3TC. However, Brotli needs to be enabled at the server level. On the Apache servers, it is generally very easy to use Brotli, since it comes as a module that can be enabled on the server.
Prevent caching of objects after settings change
Enable this setting to serve users updated content when the settings change. It is recommended to enable expires headers, Etag headers and ‘prevent caching of objects after settings change’ to force browsers to load the latest content when settings change.
Remove query strings from static resources
URLs with query strings are generally not cached and you can leave this setting disabled unless you specifically need it.
Don’t set cookies for static files
Enable this setting.
Don’t process 404 errors for static objects with wordpress
Leave this setting disabled.
Rewrite url structure of objects
Leave this setting disabled. Use it only when you know there is a specific reason to use it.
Please use the default settings for expires header lifetime which is 31536000 seconds. In the cache control policy, make sure that public, max-age=EXPIRES_SECONDS is selected, which will ensure that the website’s static assets are cacheable by browsers.
In the security headers section of browser caching, you can find the security related settings. If you are not already using a security plugin on your website to enable these settings, you set X-XSS protection as well as X-Frame options and X-Content-Type options to keep your website secure against attacks.
Enable CDN with W3TC
You may be interested in adding cdn support to your wordpress website. W3TC allows you to use any cdn with your wordpress site. Whether Stackpath, bunny cdn,KeyCDN or Cloudfront, you can add it to your website using the W3TC CDN settings. The pro version of the plugin also allows for Full Site Delivery (FSD) with cdn.
.png) However, to enable CDN you will first need to enable the cdn settings in the general settings. Check the box to enable cdn settings and then select the cdn you want to use from the dropdown list. If the cdn you want to use is not listed there, just select ‘generic mirror’ and save the settings.
However, to enable CDN you will first need to enable the cdn settings in the general settings. Check the box to enable cdn settings and then select the cdn you want to use from the dropdown list. If the cdn you want to use is not listed there, just select ‘generic mirror’ and save the settings.
.png) Now, go to the CDN settings and then check the boxes for the files you want to be delivered via cdn. It will include the wp-content and wp-includes files as well as media attachments and the minified css and js files. You can also select to add canonical headers with W3TC to avoid duplicate content issues caused by CDN. Apart from that, with W3TC you can add CORS headers also.
Now, go to the CDN settings and then check the boxes for the files you want to be delivered via cdn. It will include the wp-content and wp-includes files as well as media attachments and the minified css and js files. You can also select to add canonical headers with W3TC to avoid duplicate content issues caused by CDN. Apart from that, with W3TC you can add CORS headers also.
.png) Add the cdn link in the cdn configuration next to ‘Replace site’s hostname with’. Once you have added the cdn link, save the settings and your site assets that you have selected to host with cdn will be delivered via cdn.
Add the cdn link in the cdn configuration next to ‘Replace site’s hostname with’. Once you have added the cdn link, save the settings and your site assets that you have selected to host with cdn will be delivered via cdn.
If you want to use Cloudflare CDN with your wordpress site, you can use the cloudflare extension provided by W3TC to add cloudflare support. It will allow you to control your cloudflare settings and purge cache from your wordpress dashboard.
User Experience
The user experience section of W#TC allows you to deliver better speed and a superior user experience to the visitors. it allows you to lazy load images as well as disable scripts not used commonly and which might adversely impact loading speed.
To enable these settings first enable them in the general settings. Here, you can enable lazy loading, disable emojis and disable wp-cembed. As for disable wp jquery migrate at the front end, you will nee dot test before applying this setting. With the pro version, you can also lazy load google maps and disable more scripts that you do not want being loaded across the site with each page load. Now, save the settings and then from the sidebar go to the user experience settings.
Here, you will find more settings related to lazy loading images and if you are using the pro version, you can set lazy loading of google maps from here.