The SEO Framework Settings for Wordpress
.png)
Wordpress SEO Framework Settings
SEO Framework is a lightweight and yet feature rich and excellent SEO plugin to optimize your Wordpress blog.
Despite being lightweight, the plugin includes all the essential as well as some advanced SEO features to help your blog rank higher and protect it from crawl wastage.
Apart from the basic indexation features and sitemap, the plugin also has other features including schema, SEO settings for feeds and some additional features that are available in the form of free and paid extensions.
The best features of SEO framework are its small size, which hardly affects Wordpress speed and the ease of set up and use. All the plugin settings are available on the same page and there are no complicated features that might confuse new users.
In this post, we will discuss in detail how to set up the SEO Framework plugin, which is known as the most developer friendly SEO plugin due to its minimal size and white hat seo practices.
The SEO Framework is a user friendly SEO plugin which means, even new users would not find it difficult to configure. In most cases, you will find that the preconfigured settings are just fine for your blog, which means you can activate it and forget it. However, the users who want more juice from their SEO efforts, can use its extensions to get more.
The SEO Framework has more than 100,000 active installations and a solid 4.9 out of five ratings in the Wordpress plugin repository.
Install and Activate the SEO Framework:
The basic version of the SEO Framework is available as a free plugin in the wordpress repository. To install it go to plugins on your Wordpress dashboard and then click on add new. Now, search for the SEO Framework and then install the plugin. Following the activation of the plugin, you can access its settings from the Wordpress dashboard.
Otherwise, you can also download the plugin from the Wordpress website and then upload it to your website. Download the plugin by visiting the following link:
https://wordpress.org/plugins/autodescription/
Click on download to download the plugin in a zip file. Now, go back to your wordpress dashboard and then click on add new plugin and then upload. It will automatically install the plugin once you upload it. Activate the plugin and start using it.
The SEO Framework Settings
As already mentioned, most of the settings in the plugin come preconfigured and you are good to go following the activation of the plugin. However, there are a few settings that you may like to visit and change after activation for better results.
The SEO Framework has all its configurations available on the same page. After activating the plugin, you will find a small SEO button on your Wordpress dashboard under the Wordpress settings. Click on this button to start configuring your plugin for use on your Wordpress blog.
General Settings
.png)
The general settings are available at the top of the SEO framework settings page. In most cases you will not need to even touch these settings since they are preconfigured to work with almost all kinds of websites.
On the layout tab, you will find the seo bar settings and counter settings. The following fields are checked by default and you can leave them enabled:
Display the SEO Bar in overview tables
Display pixel counters
Display character counters
The query alteration settings are available on the performance tab in the general settings. These settings affect database performance and you should leave them enabled. THe SEO Framework will perform the search query alteration and archives query alteration inside the database instead of doing it on site.
On the canonical tab, you will only need to set your preferred canonical version which is either http or https. If you have ssl enabled on your site, set the preferred canonical version to https and your task is done. Now the plugin will automatically add rel canonical tags to posts, pages, archives and home page.
The timestamps tab includes the timestamp settings that indicate when a post or page was modified or published. You can keep the default version. The exclusion tab is disabled since the urls you want to exclude can be safely marked as no index.
Title Settings
.png)
Inside the title settings, you will find three tabs that include general, additions and prefixes. On the general tab you can select the title separator. Please continue with the default or change to another if you like to use a different separator since it will not have any impact in terms of SEO.
The additions tab allows you to select where you want to add the site title in searches. Generally, the site title is appended to the right end of search titles. This is also the default setting in the SEO Framework. In case, you do not want to add the site title to search titles, you have the option to do so on the additions tab. However, you must leave it enabled since it is good in terms of both SEO and branding.
At the end in the title settings, you will find the prefixes tab. The plugins adds a descriptive prefix to the archives titles. If you want, you can remove the prefix from here.
Description meta settings:
.png)
The SEO Framework can automatically generate titles and descriptions for posts and pages. It is also helpful in terms of open graph settings for Facebook and Twitter since they require descriptions. Please leave the automatic description generation settings enabled.
If you want you can write your own SEO titles and descriptions for each post. However, leaving the automatic description generation settings enabled will help if you missed any posts. Leave the html parsing method as the default selection.
Homepage settings
.png)
The homepage settings apply to the homepage of your website. It is a very critical page and should not be no indexed or no-followed for any reason.
In the general tab, you can add a nice looking title and meta description for your home page.
You can disable the meta title addition for the homepage on the additions tab since the title of the homepage will automatically include the site title and there is no need to include it twice.
In the homepage settings, you can also add the social settings for your website’s homepage. Click on the social tab in the home[age settings and then fill the title and description for the open graph tag. Next, you can fill the twitter title and description as well as add a url for social image for your website’s homepage.
The Robots tab includes the settings to no-index and no-follow as well as no-archive the homepage. By default the home page should not be marked as no index or no follow. So, you can leave these settings disabled. However, if you want the paginated pages like example.com/page/1/ marked as no index, you can do that from here. If you do not want the paginated pages on your site getting indexed by Google, you should enable the checkbox next to ‘apply no index to every second or later page’ of the homepage.
It is a good practice to mark these pages as no index since you don’t want these urls getting indexed and causing index bloat.
Social meta settings
.png)
The social meta settings includes the detailed settings for social channels and how your post appears on the social media platforms.
The social meta settings includes general settings as well as specialized settings for Facebook, Twitter, oEmbed and the post date configurations for the social channels.
Most of the important settings are enabled by default in this section. You will find the checkboxes enabled for outputting important tags like Open graph tags, twitter tags, and oEmbed scripts. The site title is removed from the social meta settings by default. In the general settings you can add an image url as a fallback image for social meta. Do not enable the checkbox next to the output short link tag since you will not need it.
Move on to the Facebook tab and add your Facebook url and Facebook App id. In the Twitter tab, you can set the look of your Tweets. The default selection which includes a summary with a large image is fine for SEO. Please add your Twitter handle to the blank box and continue with the default selections for oEmbed scripts.
Schema Settings
.png)
The SEO Framework plugin automatically adds the schema data to your webpages. However, you will find the options for breadcrumbs and sitelinks searchbox enabled by default. The structure tab would not require you to make any changes since all the important settings are enabled by default.
Please move on to the presence tab where you can add your organization name if you have selected for the website to represent an organization or your own name if it represents a person.
If it is not a single page site, you can use organization and use the website name for organization name. You can also add the url to the website logo in the presence tab at the bottom.
Robots Meta Settings
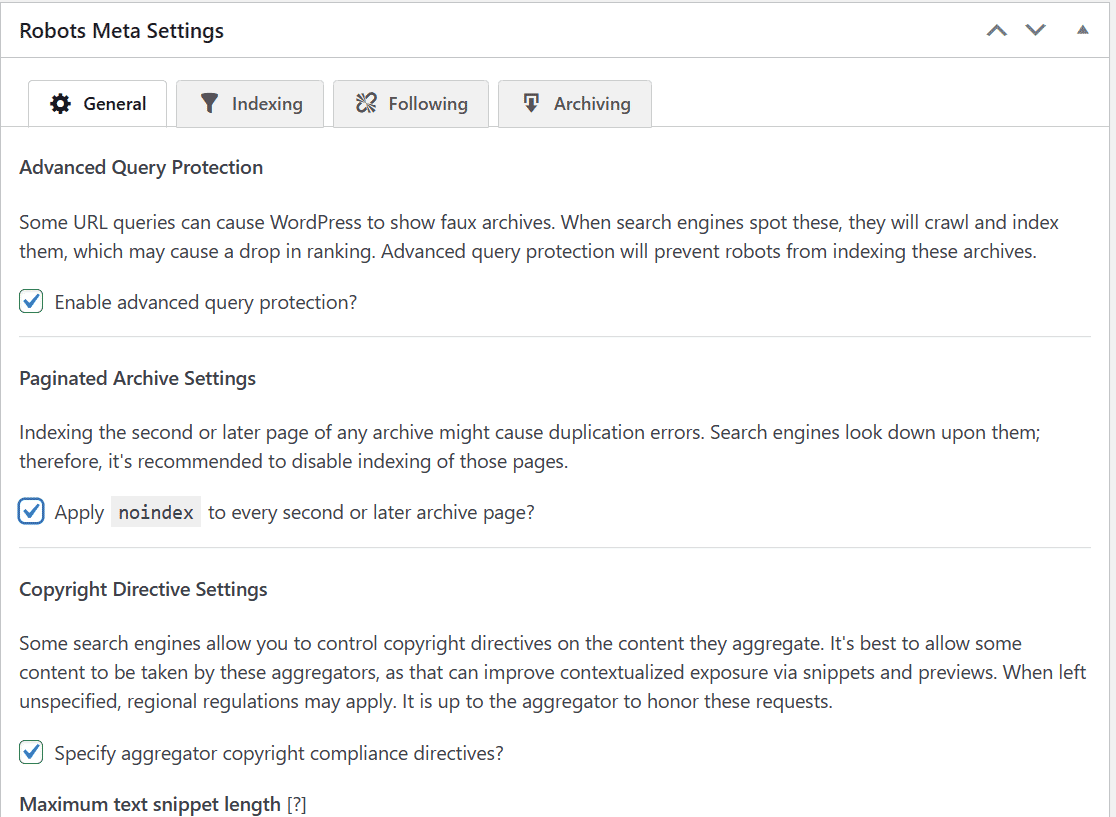
The Robots meta settings of the SEO Framework plugin includes an important setting which prevents query strings from getting indexed by Google. Sometimes, URL Queries can cause Wordpress to show faux archives. If the search engines crawl and index these urls, it will cause index bloat and result in a decline in rankings in search results. This feature to enable advanced query protection is enabled by default. It helps no index urls with query strings and thus keeps them out of Google indexation. It is also good for managing the crawl budget which can otherwise be wasted on urls with query strings.
Below the settings for advanced query protection, you will find the settings to disable the indexation of paginated archive pages. For example, you do not want your paginated category or tags pages getting indexed by Google, which if happens will cause heavy index bloat and may take months to get rid of. Therefore, it is pertinent to mark the paginated archive pages as no index. This feature is not enabled by default but you can enable it by simply ticking the checkbox.
You can leave the rest of the default settings as it is in the general tab of robots meta settings and move on to the indexing tab. On this tab, you will find the settings to apply no index to various urls. You do not apply to no index to posts or pages since these have to appear in search results.
However, you can mark your category urls and tag urls as well as other archive and format urls as no index. Check the box next to categories and tags to mark them as no index. You can also check out the following and archiving tabs, where you can mark urls as no follow or noarchive.
Webmaster Settings
.png)
The webmaster settings allow you to integrate your wordpress site with services like Google search console, Bing webmaster account and Pinterest verification code.
In this section, you can add your Google search console verification code. If you have not already submitted your website and sitemap to the Google search console, do it now to track the performance of your website. We have provided detailed guidelines to add your website to the search console in this post.
Sitemap & Robots.txt
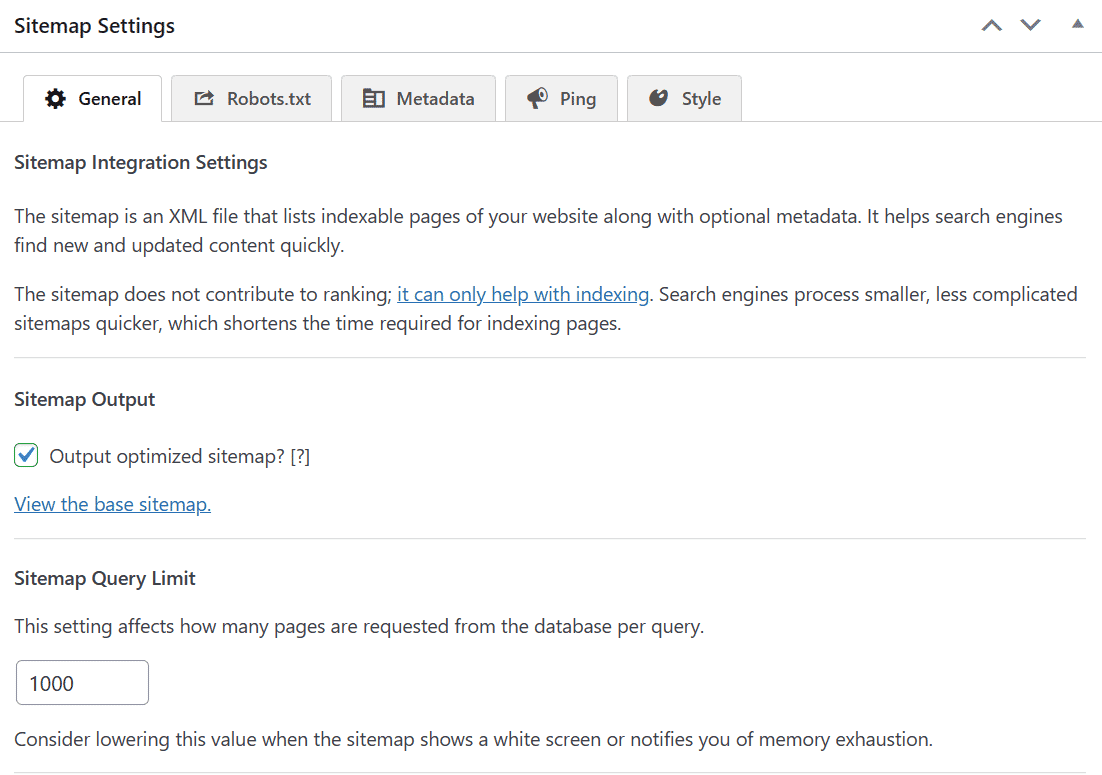
A sitemap is a vital part of Wordpress SEO and also critical to getting your site regularly crawled and urls indexed.
The plugin outputs an optimized sitemap. The default values in the general tab of sitemap settings are generally fine. However, you can lower the value for Sitemap query limit if you face any issues. By default, the sitemap settings are enabled and you can disable them if you are using a dedicated plugin to output a sitemap.
In the sitemap settings, the plugin also includes the robots.txt settings for your website. You can make any changes from the robots.txt tab. In the metadata tab, you have the option to show the last modified timestamp with urls in the sitemap. You should leave this setting enabled. The default settings to notify Bing and Google about changes are fine for ping settings in sitemap. So, leave the default settings on. The plugin uses cron for pinging Google and Bing.
If you want you can style the sitemap or change the color of the sitemap header and urls from the style tab in sitemap settings.
If you want to show the site logo in the header of the sitemap, just add the logo url in the blank box for the logo.
Feed Settings
The SEO Framework also includes settings to manage Wordpress feeds. It converts the feeds to excerpts by default so that the content is not stolen by bots through feeds. By default, Wordpress feeds are marked as noindex by the plugin and there is no reason to change the setting. So, again you can go with the default configurations for the feed settings.
The SEO Framework Post SEO Settings
Users can change the settings for individual posts also using the SEO Framework plugin. You can add title and meta descriptions to individual posts. These settings are found under individual posts.
In the social settings under each post, you can check out the open graph title and description as well as twitter title and description. The visibility tab (available under the posts with the title and description settings) controls multiple things like indexation, canonical url and redirection.
The SEO Framework also includes the redirection feature to redirect a post to another url which can be accessed from under the individual posts in the visibility section. If you want, you can no index, no follow or no archive a specific post from there as well. Apart from that, if you want to set a different canonical url than the default one, you can do it from here.
.png)
Additional Features in the SEO framework
The SEO framework also offers additional functionalities which are available through extensions including free ones and premium extensions. While the free extensions can be used by installing the TSF Extension manager, the premium extensions are available with the pro version available for $84 per year. With the pro version, you can use the SEO framework plugin and all its premium extensions on two Wordpress websites. The extensions can be used by installing the SEO Framework extension manager plugin which can be downloaded from the SEO Framework website. Below is a list of all the free and premium extensions:
Free SEO Framework extensions:
TRANSPORT
Transport is a free extension provided by the SEO framework for migrating SEO metadata from other plugins to the SEO framework. Some plugins like Yoast include this feature in the original plugin. However, the SEO framework provides this feature as an extension, which means you can use the extension to migrate SEO data and then can delete it. It helps keep the size of the main plugin minimal with no impact on Wordpress speed.
AMP
As indicated by its name the AMP extension is meant for websites that are using the AMP plugin to provide amp pages for mobile. This extension connects the SEO framework to the AMP plugin.
INCOGNITO
The incognito extension does a simple job. It hides all the development comments from the SEO framework plugin.
ORIGIN
The origin extension is free and is used for image SEO. Wordpress generates a separate url for all the image attachments. However, this can sometimes lead to index bloat if these urls get crawled and indexed by Google. So, it is generally better to redirect the attachment urls to the original posts which can be done with the help of the origin extension. Some other SEO plugins like Rank Math and AIOSEO have also included this feature.
TITLE FIX
You may need the title fix extension if your theme is not doing it right. It fixes the SEO titles so that the title output is as configured.
The SEO Framework premium extensions
FOCUS
The focus extension is meant to help you right targeted content that will rank higher in search results. You can enter focus keywords and the plugin will accordingly make suggestions. It also provides synonyms and inflections of those keywords.
ARTICLES
The articles extension adds important structured data automatically which enhances the chances of ranking higher in search results. It is good for news publishers as well as blog writers. The extension includes a Google news sitemap also.
.png)
HONEYPOT
The honeypot extension is an anti spam extension that comes with the premium version of the SEO Framework. It catches the comment spammers with a 99.9% success rate. It uses five lightweight and yet effective methods to catch comment spammers without any risk of data leakage.
CORD
Cord helps you connect your website with important services like Google analytics and Meta pixel. If you are using SEO Framework premium, you will not need to use a different plugin for managing google analytics.
LOCAL
The local extension is meant for local businesses that want to be found locally in Google searches. If you are running an online shop or a physical shop catering to local customers, this extension will be very helpful for you. You can use this extension to set up im;portant local business information like location, opening hours etc. this information will be consumed by search engines which will help your business be found online by local customers searching for products/services.
MONITOR
Monitor will crawl your website to find any SEO related issues. It conducts a two phase check. In the first phase, which happens on the SEO Framework servers, it will crawl your website to discover common errors and in the second phase, it will compare the data it has found to your Wordpress environment. The data collected in the first phase is sent back to the Monitor extension and the second phase takes place on the Wordpress dashboard and you are presented with the analysis and report to help you make improvements.