How to Use Cyberduck to Connect to Server
How to upload and download files from Server using SFTP Client Cyberduck
Cyberduck is a popular FTP/SFTP client used for connecting to servers and uploading and downloading files. If you want to upload or download files from the server, you can use cyberduck to safely connect to your server over SFTP and download or upload the files. The software is easy to use and has a user-friendly interface.
In this article, we will show you how to use Cyberduck to upload and download files from the server.
There are mainly two methods you can use to SSH connect using CYberduck. The first method is the username and password method and the second method relies on the use of a private key. Suppose, you have created an EC2 instance, then you must also have created a keypair that you can use for SFTP connections. One part of the key pair or the private key is downloaded to your local machine which you can use to connect to your server using cyberduck.
Whether you are migrating your website or just uploading a file to the server or editing files on the server, you can easily complete these tasks using cyberduck. You will not need to login each time either since Cyberduck remembers the credentials you used to login the first time.
Cyberduck is a free software and you can download it from here for Mac or Windows OS. Download and install the software from the installer.
SSH Connect with Cyberduck using private key
You can SSH to your server via cyberduck using the private key you have saved on your local machine. First open Cyberduck from programs.
If you are trying to login using a private key, you will only need the ip address, username and private key.
.png)
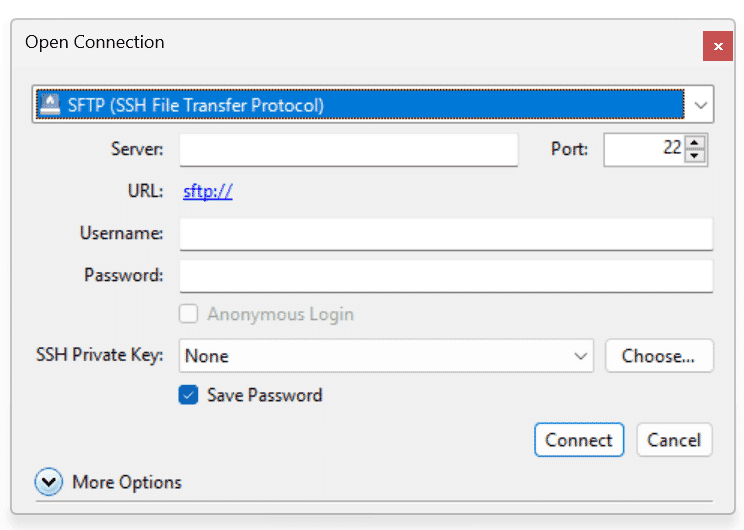
Click on file on the top left and then on open connection. Enter the public ip address of your server in the box next to the server. Then enter the username. The default port for SFTP connections is 22 and that for FTP is 21. Make sure you have selected SFTP for connection type at the top.
Now, you will see that the url for connecting with your server is sftp://user@public-ip-address.
Click on choose next to the SSH private key and then select the private key from the folder you have saved in. It must be saved as a file with the .pem extension. Leave the password filled blank.
Now, click on connect. If you have entered the right username and valid ip address, you will be connected within seconds. If you see a fingerprint warning, click on Allow. Once you are connected, you can go to the root folder of your website and start editing files.
SSH connect with cyberduck using password
SSH private key is one of the methods to establish ssh connection to a server using cyberduck. The other method is the username with password method. If you have already created a username and password for login to your server, you will be able to use them to establish ssh connection using cyberduck.
However, if you have not created a username and password for login, you must create them first. Rather than using the root user for ssh connections, it is recommended to create a new user and assign him the essential permissions to write to the root folder.
To create a new user, you need to ssh to your server and then run the following command:
sudo adduser <username>
For example, you want to create a new user named sammy:
sudo adduser sammy
Now, the system will prompt you to create a password for the newly created user. Create a strong password and then reenter the password. You have created your new user and password.
However, if you have an existing user and want to create password for it, you must run the following command:
sudo passwd sammy
Replace sammy with the username in the above command.
Now that you have created the username and password, you need to make some changes to the system before you can login using the username and password set. You will need to open the ssh configuration file and make changes inside it.
sudo nano /etc/ssh/sshd_config
Scroll down until you find the following line:
#PasswordAuthentication no
Change it to:
PasswordAuthentication yes
Now, close and exit the file and reboot the server. Once you have rebooted the server, you are ready to login using the newly created username and password set.
Open Cyberduck. Click on file and then open connection. Enter the server ip and make sure SFTP is selected at the top in the dropdown menu for the connection type. Now enter the username and password you just created. You can tick the checkbox to remember the password so you do not need to enter it each time you have to login. This is very useful for those who have to make frequent updates to the server or those running static websites.
Suppose, you want to connect again to the same server, you will not need to enter the ip again. You can instead go to bookmarks and from the history select the public ip of the server you want to connect with. Select allow when you receive the fingerprint warning.
Uploading files to the server using Cyberduck is very easy. You can just go to the directory where you want to upload the file and then click on upload at the top. Select the files you want to upload and then again allow when you receive the fingerprint warning.
Similarly, you can doubleclick a file you want to download to your local machine. Otherwise, you can right click on it and then select download or download to if you want to select a different download destination.