Hugo Website on Apache Server
How to Run a Hugo Website on Apache Server
Hugo is the world’s fastest static website generator that you can easily run on various platforms like Cloudflare pages, github or Netlify. However, if you want, you can also run a hugo site on an Apache or Nginx server. Read this tutorial to learn more.
Why use Hugo for your website/blog?
Hugo is the world’s fastest framework for creating websites. It is an open source static site generator that you can use to easily generate a website and bring it online in minutes.
Speed has become an important factor in terms of SEO and therefore a large number of web designers are relying on Hugo to create websites and blogs. Even without any speed optimizations, Hugo websites load a lot faster compared to the others.
Hugo also offers more than 300 themes to create awesome looking websites. On an average, it takes less than a second with Hugo to build and render a website. You can design absolutely awesome websites that look matchless with Hugo because of those attractive themes and customizations. You will not need to worry about SEO either since while you will already have a blazing fast website, you can also apply other on page SEO optimizations with ease using Hugo.
In this tutorial, we will show you how to create a Hugo blog and run it on an Apache server. You have multiple options to launch your Hugo website including Amazon S3, Guthub, Netlify and so on. However, if you want you can also run a Hugo website on a server. You will not need a very large instance (VM) and can start with a small one which will keep costs under control for you.
If you are using an Apache server, you can use the .htaccess file and utilize Gzip and browser caching for additional speed. Since Hugo is built for speed, even without any optimizations, the hugo websites load superfast.
Another important benefit of running Hugo on a server is that you can perform all the tasks directly from the terminal, without needing to physically move any files. You will only need ssh access to your virtual machine and Apache server and Hugo installed on it.
So, let’s begin with the launch of an EC2 instance and install apache server on it.
Launch EC2 Instance
Login to your AWS Console and go to the EC2 dashboard from where you can launch a fresh instance.
Click on the launch instance button at the top right.
Give your instance a name like hugo-website-server and select Ubuntu for the AMI (Amazon Machine Image).
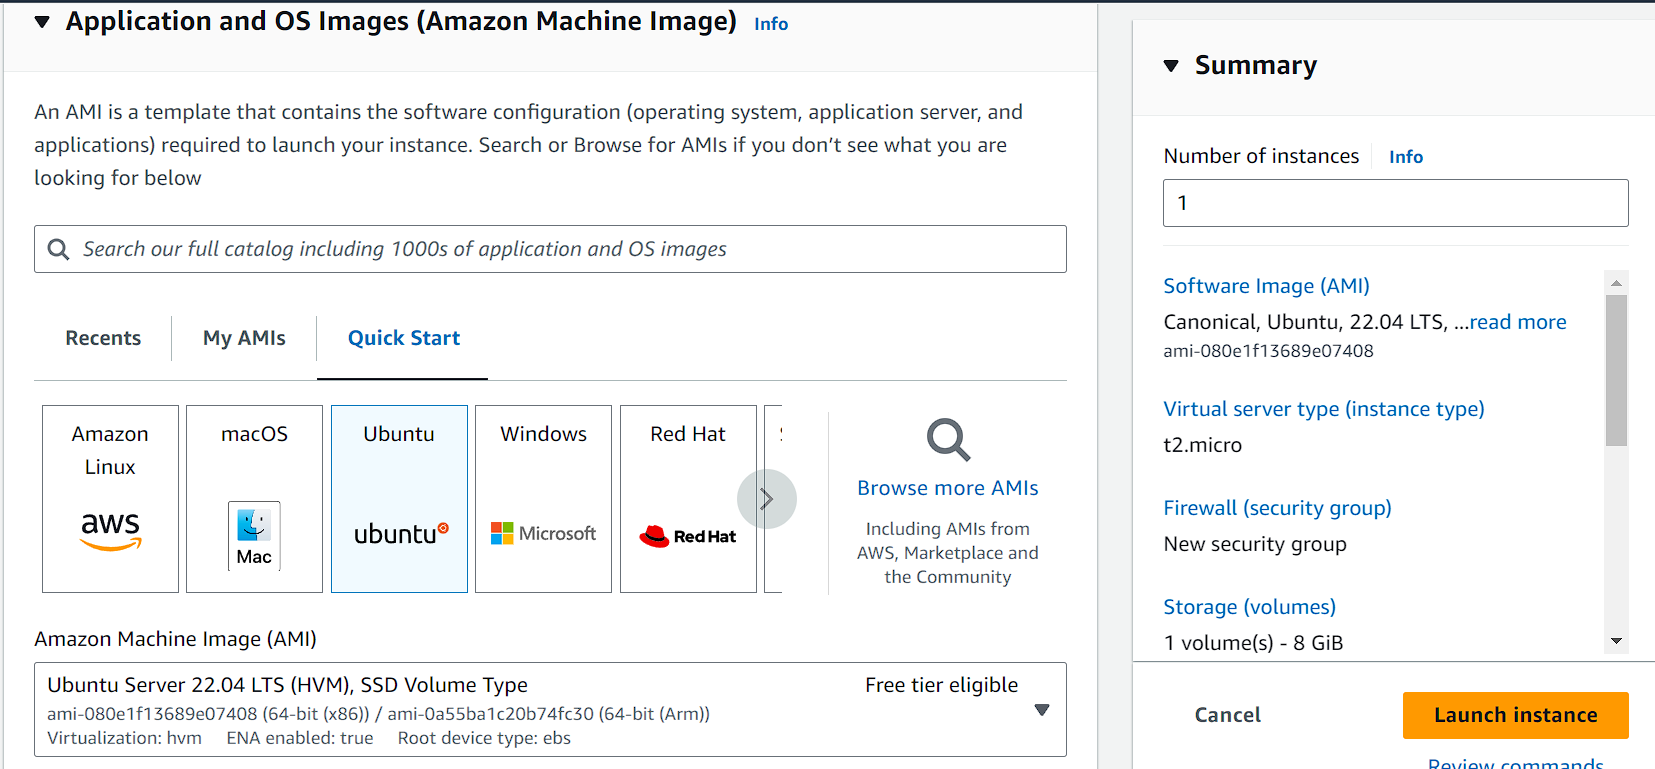
We will be using a t2.micro instance for our server. It is the default selection in the list. If you are eligible, you might end up hosting your blog on a t2.micro instance for absolutely free.
In the keypair section, click on create new keypair and then give your keypair a name. The keypair will be downloaded to your computer in .pem format.
Use the default VPC and subnet or create a new one.
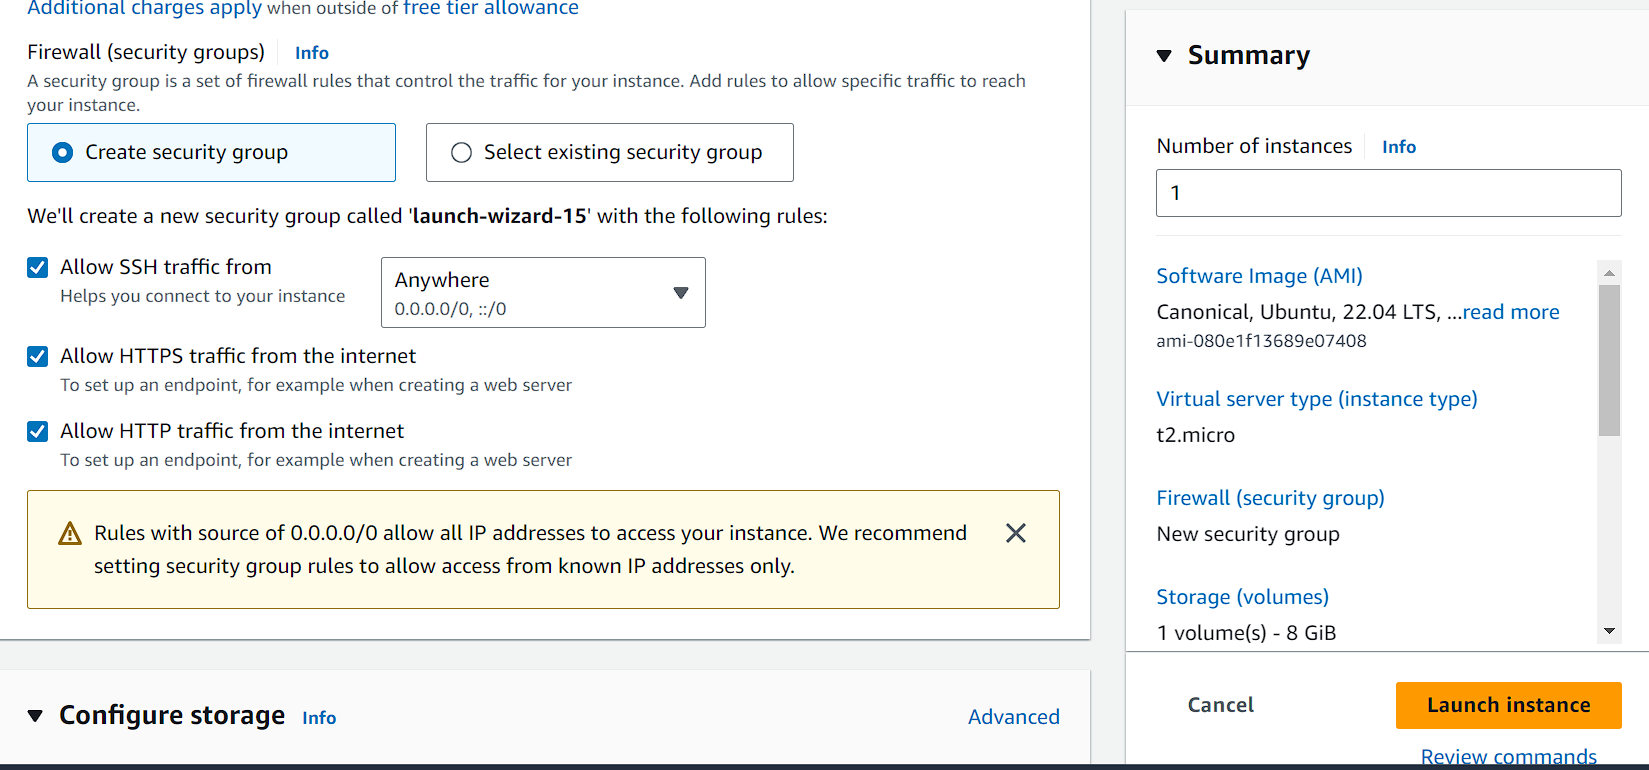
Now, you will need to create a security group to allow ssh traffic, and http and https traffic from the internet. You can allow SSH traffic from anywhere or just or your own ip.
We do not need much extra storage, so we can continue with the default selection of 8gb.
Now, click on launch instance. A few seconds later, you will see a message in green saying the launch of the instance has been successfully initiated.
Now, go back to your EC2 dashboard and select the instance you have just launched. The instance is initially in pending stage and a few minutes later, its status changes to running. Once the instance is running, you can successfully SSH connect with your instance.
Install Apache Server
Wait until the status of your instance has changed to running. Click on connect to connect with your instance.
Once you are connected to the instance, you will need to run the following commands to install the Apache server.
sudo apt update -y
sudo apt upgrade -y
sudo apt install apache2 -y
Hit enter if you get the message ‘new kernel available’. The Apache server is now installed on your instance and you can check its status by running the following command:
sudo systemctl status apache2
You will receive a response like the following:
● apache2.service - The Apache HTTP Server
     Loaded: loaded (/lib/systemd/system/apache2.service; enabled; vendor preset: enabled)
     Active: active (running) since Fri 2024-04-12 06:32:27 UTC; 1min 31s ago
       Docs: https://httpd.apache.org/docs/2.4/
   Main PID: 10225 (apache2)
      Tasks: 55 (limit: 1121)
     Memory: 4.8M
        CPU: 37ms
     CGroup: /system.slice/apache2.service
             ├─10225 /usr/sbin/apache2 -k start
             ├─10227 /usr/sbin/apache2 -k start
             └─10228 /usr/sbin/apache2 -k start


Apr 12 06:32:26 ip-172-31-19-202 systemd[1]: Starting The Apache HTTP Server...
Apr 12 06:32:27 ip-172-31-19-202 systemd[1]: Started The Apache HTTP Server.
It shows that the Apache server is now running. You can use the following commands to start, stop, restart and reload apache server.
To start apache server:
sudo systemctl start apache2
To stop apache server:
Sudo systemctl stop apache2
To restart apache server:
sudo systemctl restart apache2
To reload apache server after changing configurations:
sudo systemctl reload apache2
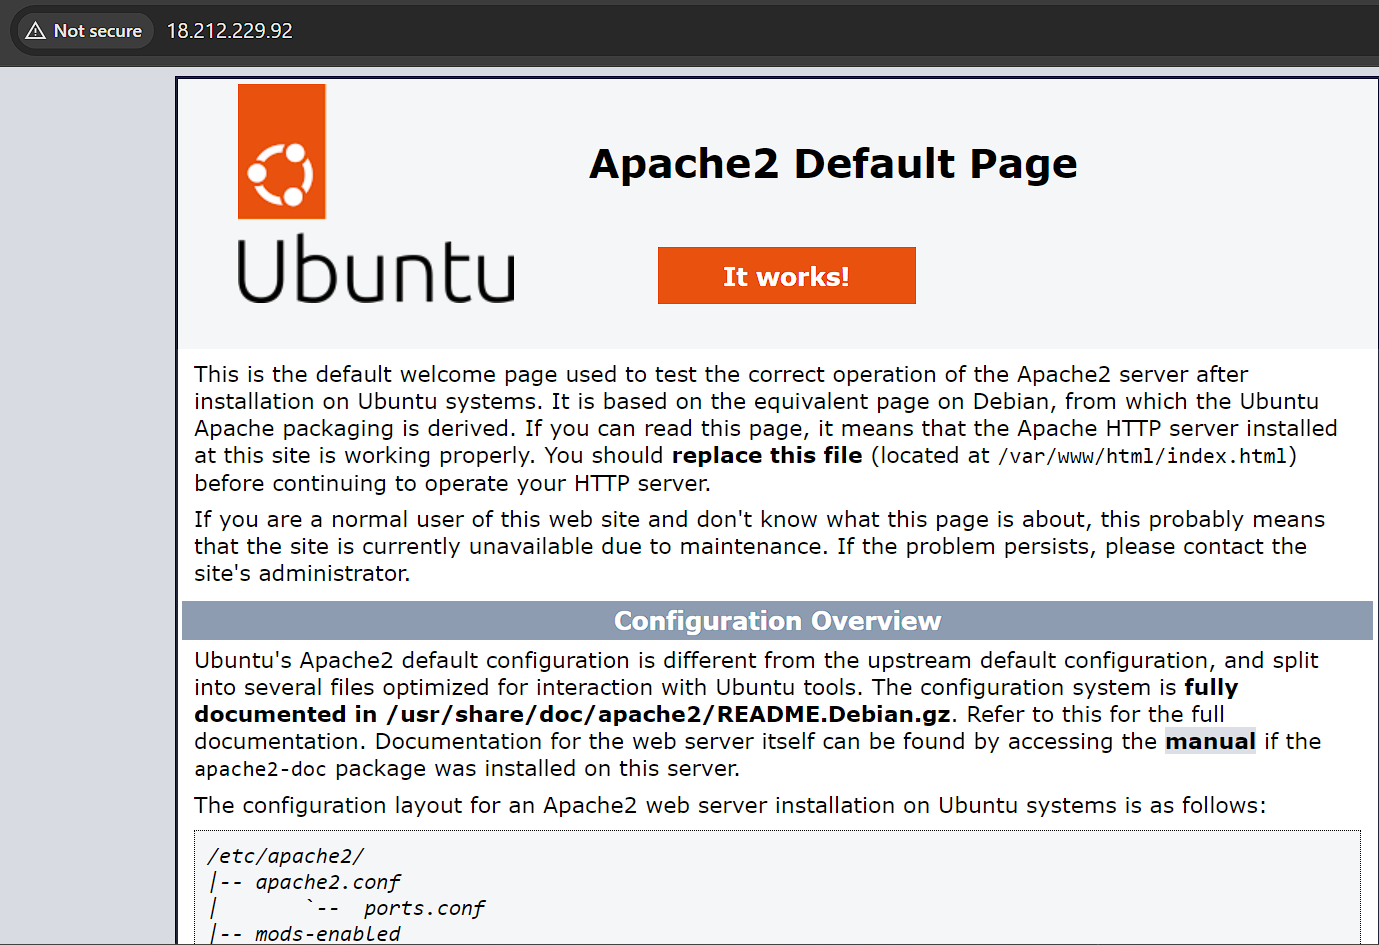
The apache server is now installed on your instance and to check, you can just copy the public ip of your instance and paste it in a browser. You will see the Apache default page that looks like this:
We will also need to create a vhosts file to run our hugo website on Apache server. However, first, we will set ownership and permissions so that hugo can create the site folder where we want. We will need a root folder that will contain all the Hugo website files and folders. Suppose, our Hugo website is named hugosite. Its root folder will be located at /var/www/hugosite. We will need to change ownership of the /var/www folder so Hugo can write to it.
sudo chown -R $USER:$USER /var/www
sudo chmod 755 /var/www
We can setup a virtual hosts files for our website now or later after we have created the website.
sudo nano /etc/apache2/sites-available/domain.conf
Replace domain in the above command with the real domain name. The above command will open a new file for editing. Paste the following content into this file.
<VirtualHost *:80>
        ServerAdmin webmaster@localhost


        ServerName example.com
        ServerAlias www.example.com


        DocumentRoot /var/www/hugosite/public


        <Directory /var/www/hugosite/public>
            AllowOverride All
         </Directory>


        ErrorLog ${APACHE_LOG_DIR}/error.log
        CustomLog ${APACHE_LOG_DIR}/access.log combined


</VirtualHost>
Note: The root folder for our vhosts file is the public folder inside the folder we will create for storing our Hugo files. When you run the Hugo command inside the Hugo website folder, it will output the files necessary to run your website into the Public folder. So, we will load our website directly from the public folder which is used as the root folder in our vhosts file.
The virtual hosts file is required to bring your website online and make it accessible through the domain name. It is also essential if you want to apply ssl to your website.
Now, let’s enable the website for which we just created the virtual hosts file.
sudo a2ensite domain.conf
Replace domain.cof with whatever you named your vhosts file or your real domain name.
Now, it is time to remove the default vhosts file.
Sudo a2dissite 000-default.conf
Done. We can now move on to installing Hugo and creating our Hugo website in our next steps.
Just remember that the document root inside the vhosts file will be the root folder in which your Hugo website files and folders are located. So, you can carry out this step after creating your hugo site if you want. Move on to the next step to install Hugo and create the website.
Install Hugo on your server
Now that we have installed the Apache server on our instance, we can move ahead and install Hugo. Installing Hugo on Ubuntu 22.04 is very easy and can be done with a single command:
sudo apt install hugo -y
Press enter again if you receive the messages that ‘new kernel available’ and which services need to be restarted.
Type the following command in the terminal to check if Hugo has been installed.
hugo version
You will receive an output resembling the following confirming that hugo has been installed on your server.
hugo v0.92.2+extended linux/amd64 BuildDate=2023-01-31T11:11:57Z VendorInfo=ubuntu:0.92.2-1ubuntu0.1
This confirms that you have installed the latest version of Hugo.
Create the Hugo Website
We will carry out all our Hugo related work inside the website folder. Hugo will create this root folder when we launch our website with Hugo.
Let’s first change directory and launch the website.
cd /var/www
We will create our new site using the ‘hugo new site’ command followed by our website name.
hugo new site hugosite
Replace hugosite with your domain name. For example, if your website is called domain1.com, replace hugosite with domain1 for ease of understanding. You will receive a Congratulations message saying, your Hugo website has been created.
ubuntu@ip-172-31-19-202:/var/www$ hugo new site hugosite
Congratulations! Your new Hugo site is created in /var/www/hugosite.


Just a few more steps and you're ready to go:


1. Download a theme into the same-named folder.
   Choose a theme from https://themes.gohugo.io/ or
   create your own with the "hugo new theme <THEMENAME>" command.
2. Perhaps you want to add some content. You can add single files
   with "hugo new <SECTIONNAME>/<FILENAME>.<FORMAT>".
3. Start the built-in live server via "hugo server".


Visit https://gohugo.io/ for quickstart guide and full documentation.
Now, change directory to the newly created website folder: /var/www/hugosite. The folder containing all the files for the static website is the public folder inside this website folder. You can also generate Hugo files locally and then upload the contents of the public folder to the root folder on your Apache server via SFTP. However, to avoid having to SFTP each time we update the website, we are using the public folder as the DocumentRoot in our Apache vhosts configuration.
cd /var/www/hugosite
We will need to add a Hugo theme before we can start working on our hugo website and adding content. Run the following command to install the Mainroad theme by Hugo.
git init
git submodule add https://github.com/vimux/mainroad.git themes/mainroad
Now, we will need to add the theme name inside the config.toml file. Open the file
Sudo nano config.toml
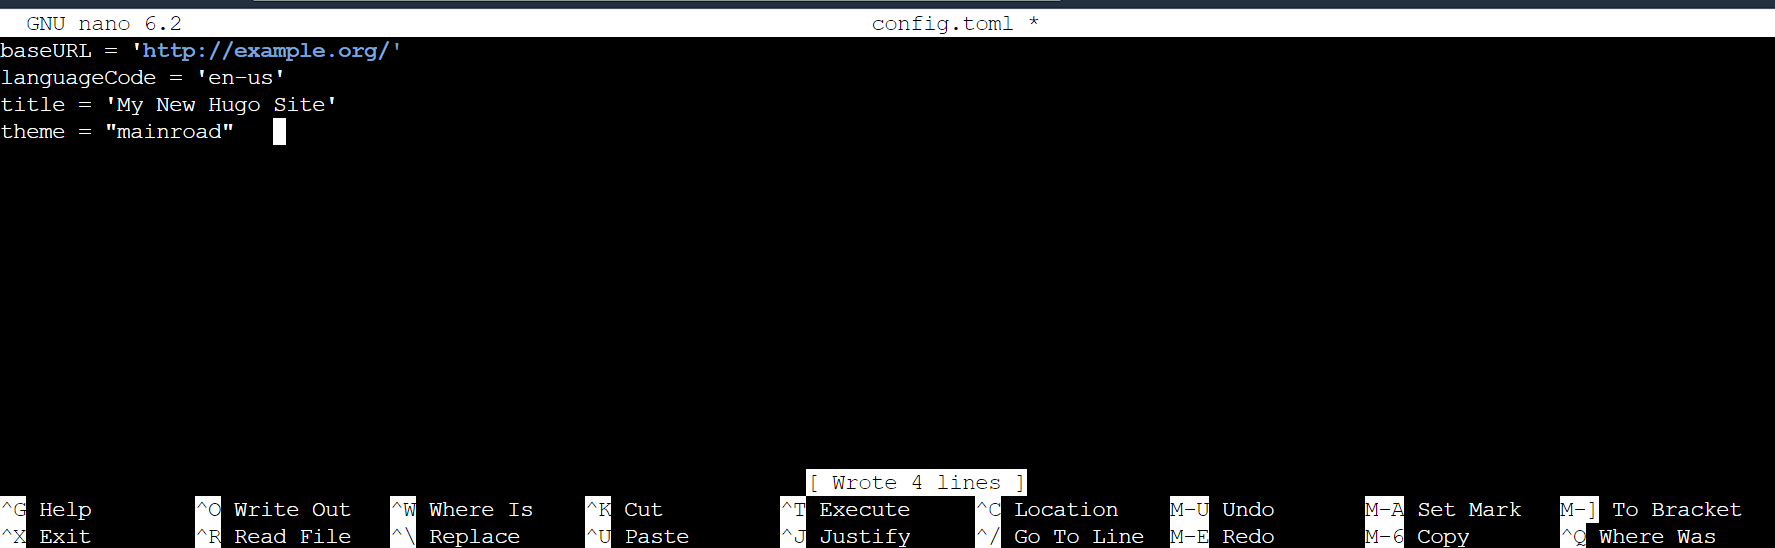
Add the following, under the existing records:
theme = "mainroad"
Change the site url and title also inside the config.toml file.
You can further customize the config.toml to add author name and bio as well as enable more features on your website like social links, website description, widgets and even a table of contents for each post or the number of posts to be included on homepage and each paginated page.
You can also add your google analytics id here. Lean how to customize these things for the mainroad theme here.
Right now, you can at least add your author name and bio by adding the following to the config.toml file.
[Author] # Used in authorbox
  name = "John Doe"
  bio  = ”John Doe is a successful blogger……”
Now, let’s add some content to our website.
We will start by adding a new post to our website. The posts folder is located inside the content folder in our root folder: /var/www/hugosite. Any new posts, we add will get added to this folder automatically. We will create a ‘hello world’ post with some Lorem Ipsum text.
hugo new posts/hello-world.md
Posts are written in markdown in hugo. So, these posts have the .md at the end. Each post that you create must follow this format and will decide the url structure.
After running the above command, you will receive the following response:
Content "/var/www/hugosite/content/posts/hello-world.md" created
Copy the path except the root folder (we are already inside the root folder) and open it:
sudo nano content/posts/hello-world.md
When you open the post, you will see that its front matter looks like the following:
---
title: "Hello World"
date: 2024-04-12T08:36:48Z
draft: true
---
The posts that you write are first in draft mode as you can see that the draft value inside the front matter is set to true. Let’s create our post by adding some content and then we will remove the draft status.
Here is the content in markdown, we are adding to our Hello World post:
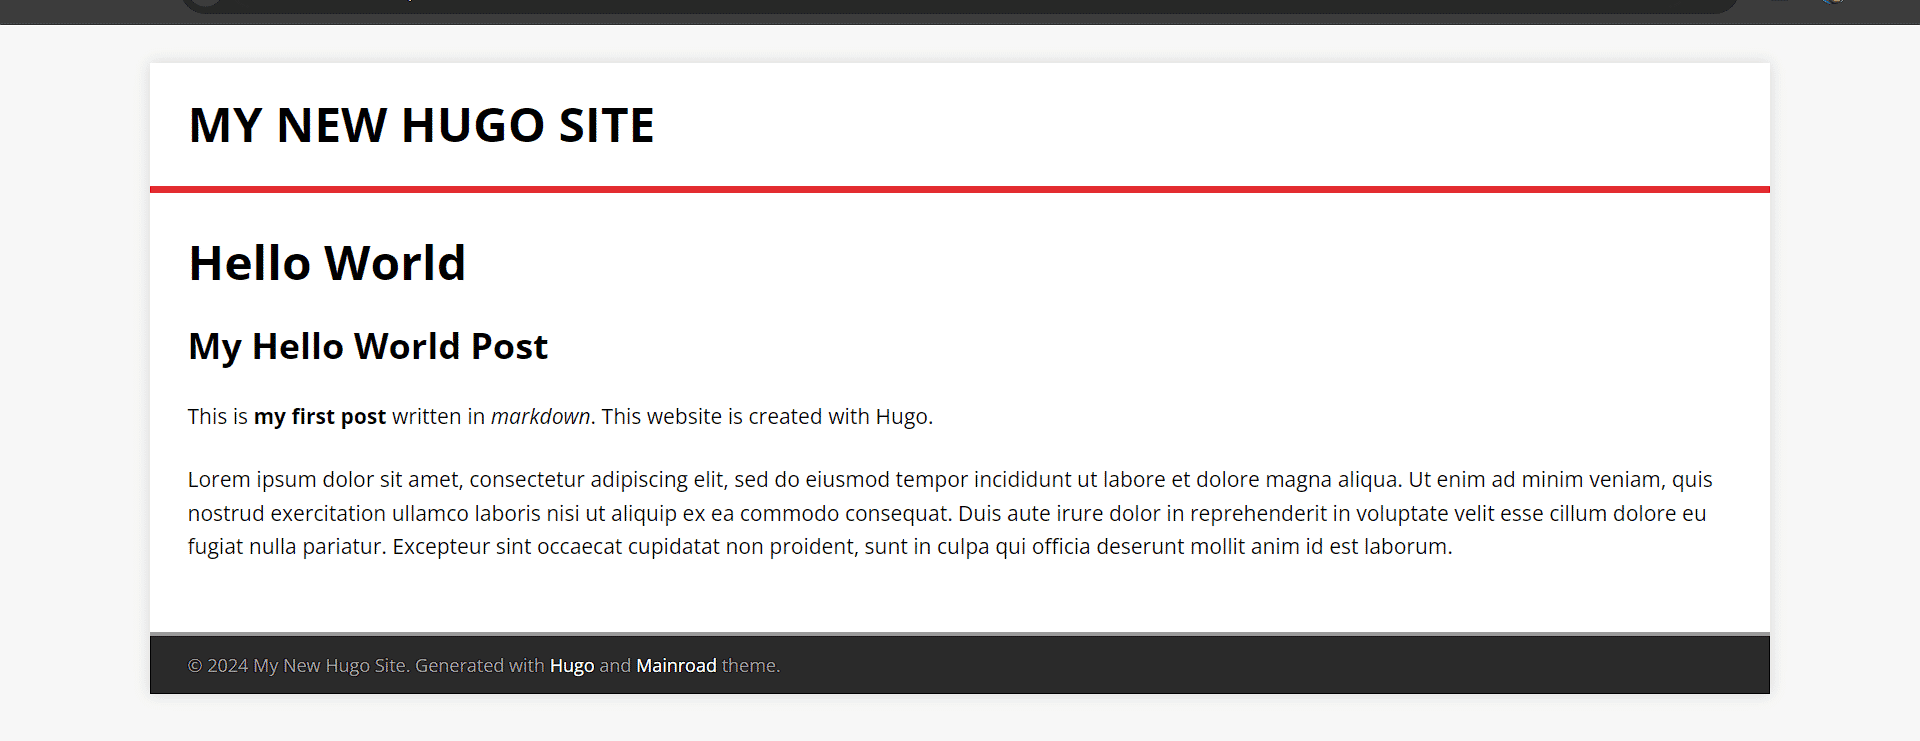
## My Hello World Post


This is **my first post** written in *markdown*. This website is created with Hugo.


Lorem ipsum dolor sit amet, consectetur adipiscing elit, sed do eiusmod tempor incididunt ut labore et dolore magna aliqua. Ut enim ad minim veniam, quis nostrud exercitation ullamco laboris nisi ut aliquip ex ea commodo consequat. Duis aute irure dolor in reprehenderit in voluptate velit esse cillum dolore eu fugiat nulla pariatur. Excepteur sint occaecat cupidatat non proident, sunt in culpa qui officia deserunt mollit anim id est laborum.
Our post is ready to publish and we will be published when we run the hugo server next time. However, we will have to change its status from draft to achieve that. Just delete the draft value and add author and description in its place.
Your front matter would now look like this:
---
title: "Hello World"
date: 2024-04-12T08:36:48Z
author: "Abhijeet Pratap"
description: "My new Hello World post"
---
Now, save the post and close it. Ctrl + S and ctrl + X.
If you have added the vhosts file to your server and applied the DNS, you are ready to launch your website. If you have not, create the vhosts file and add your public ip to the DNS records for your domain name by creating an A record.
Everything is ready and you are just a few steps from finally launching your hugo website on Apache server. If you want to add ssl before launching, follow these steps:
sudo apt install certbot python3-certbot-apache -y
This will install the certbot so that you can install the free ssl from Let’s encrypt on your website.
Now, you can run the certbot to get a free Let’sEncrypt ssl.
sudo certbot --apache
Enter your email when prompted and then answer the questions with yes. If you have made the DNS changes, the ssl will be successfully deployed and you will get a message.
Congratulations! You have successfully enabled HTTPS on your website.
So, we are all set and here comes the final step. Make sure you are inside the Hugo website folder and run the following command to launch your hugo website.
hugo
In less than a second, you will receive a response like the following:
Start building sites …
hugo v0.92.2+extended linux/amd64 BuildDate=2023-01-31T11:11:57Z VendorInfo=ubuntu:0.92.2-1ubuntu0.1


                   | EN
-------------------+-----
  Pages            |  7
  Paginator pages  |  0
  Non-page files   |  1
  Static files     |  5
  Processed images |  0
  Aliases          |  3
  Sitemaps         |  1
  Cleaned          |  0


Total in 118 ms
(When you run the Hugo command, it generates the static website whose files are located inside the public folder in the main website folder.) Now, go and paste your domain address in a browser and enter.
Congratulations, you have created your hugo website and it is successfully running on Apache server. Enjoy the blazing fast speed and an awesome looking website with everlasting peace of mind.
Please note that every time that you update your website, you will need to run the same command:
hugo
Note: Otherwise, you can develop the site locally and then upload the contents of the ‘public’ folder to the root folder on your Apache server. However, you will need to update the contents of the root folder each time when you update the site.