EC2 Create Key Pair
How to Create Key Pairs for EC2 Instances
EC2 (Elastic Compute Cloud) Instances by Amazon have grown highly popular among users including developers, bloggers and enterprises. These instances are cost effective, secure and easily scalable as well as easily manageable. These instances are very easy to launch and use. When you are launching an EC2 instance, you are required to create a key pair for that instance. The Key Pair is required if you want to ssh connect with your instance. In most cases, you will need to.
What is an EC2 Key Pair?
A Key Pair is a set of credentials that includes a public key and private key. The public key and the private key are part of the same set and must match if you have to connect successfully with your instance using SSH. These keys are required when you want to ssh to your instance since they help you prove that you are the rightful owner of the instance.
If you are trying to connect to your Linux instance, the private key will let you connect securely with your instance via ssh. If it is a windows instance, the key is required to decrypt the administrator password which you can then use to connect to your instance.
You can use the private key to SFTP to your instance using a SFTP client like Cyberduck.
So, when you create a keypair, the public key gets stored on the instance and the private key is downloaded to your computer as a .pem file. You must securely store the private key on your computer since anyone who has access to the private key can access the instances using the keypair.
When you launch an instance, you can specify a key pair or skip it. However, specifying a key pair is recommended for security and you can create a new one or use an existing one depending on how you manage the security of your instances.
After you launch your instance and it boots for the first time, the public key you have specified is stored in an entry inside ~/.ssh/authorized_keys. When you have to ssh to your instance, you will need to specify the private key that corresponds to the public key. You can also use the AWS session manager as an alternative to key pair.
How to create EC2 Key pairs?
There are two main methods that you can use to easily create keypairs. One is to create it using AWS and the other is to use a third party tool to create a key pair. If you use a third party tool to create a key pair, you can import it to your AWS console.
Note: Amazon EC2 supports both ED25519 and 2048-bit SSH-2 RSA keys for Linux instances and only 2048-bit SSH-2 RSA keys for Windows instances. A user can create up to 5,000 key pairs per region.
Create key pair using AWS console
The easiest way to create a key pair with a few clicks is to use the AWS web console. Just login to your AWS account and go to the EC2 dashboard. In the left side bar, you can find the keypairs under the network & Security section.
.png)
Now, click on Key Pairs and go to the Key Pairs dashboard. Here, click on the Create Key Pair button on the top right.
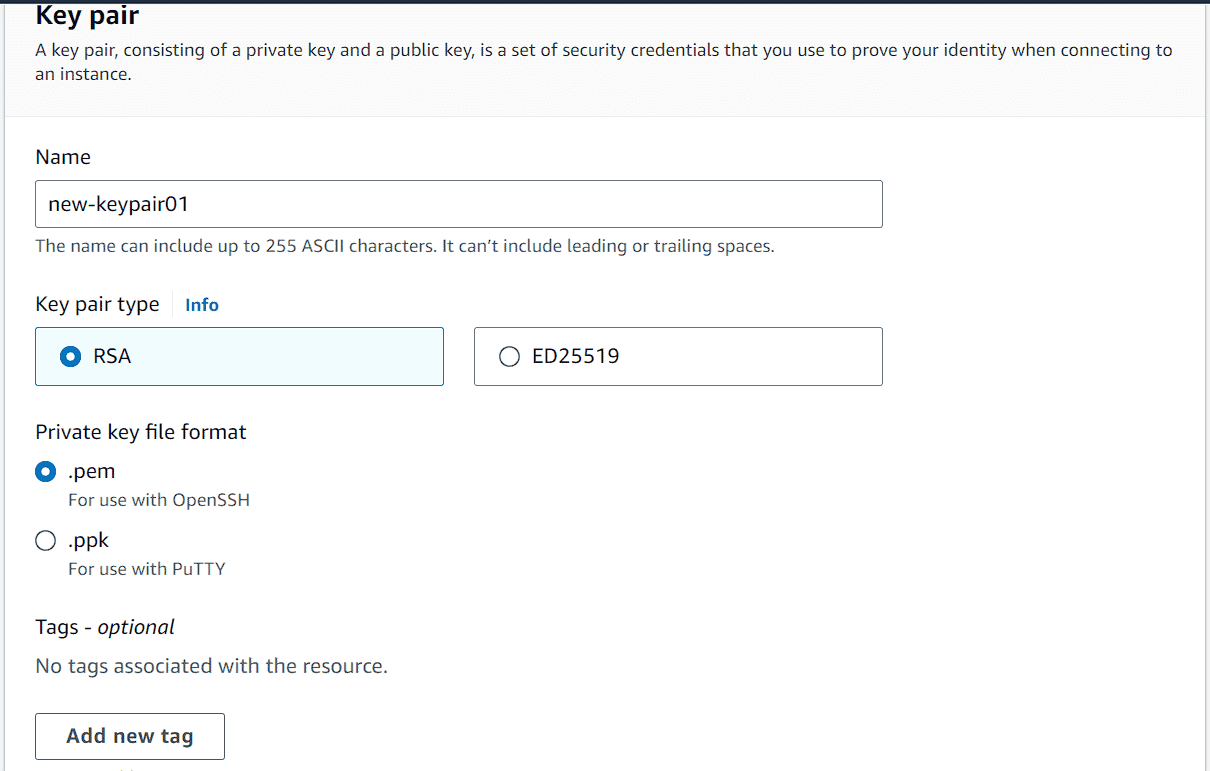
On the next page, enter an easy to remember but unique name for the key pair you want to create such as new-keypair. If you want to connect to your instance using openssh, you will need to select the .pem file format and if you want to use Putty to connect to your instance, you will need to download in the .ppk format.
For the keypair type, continue with the default selection RSA. For the private key file format, select .pem for open ssh connection and .ppk for Putty.
.png)
You can also add tags to your key if you like and then hit create key pair. The private key with .pem extension will be downloaded to your computer. Make sure to store it safely. Now, you can find the key pair you just created in the list of key pairs on the dashboard. When you create an instance, you can specify this key pair to be used with it.
Create key pair using AWS CLI
If you like doing things from the terminal, the AWS CLI offers an easy method to create new key pairs. For the tech savvy, generating the key pair using the AWS CLI can be even simpler and you can create it with just a one line command. If you can run terminal commands, all you need to do is to install the AWS CLI and you can start doing tasks with its help.
You can run the following script to install AWS CLI locally:
msiexec.exe /i https://awscli.amazonaws.com/AWSCLIV2.msi
Provide the required details and you will have AWS CLI installed on your computer. To check if AWS CLI has been installed correctly, check AWS version:
aws --version
You will receive an output like the following:
aws-cli/2.15.36 Python/3.11.8 Windows/10 exe/AMD64 prompt/off
It means you have successfully installed the AWS CLIn your computer. To create the key pair, we will run the ‘aws ec2 create-key-pair’ command. However, we will also need to specify the key pair name, type and format. The final command will look like this. (change directory to where you want to save the key pair). For example: cd Downloads/
aws ec2 create-key-pair --key-name my-first-keypair --key-type rsa --key-format pem --query "KeyMaterial" --output text > my-first-keypair.pem
The create key pair command is used to generate the key pair and save the private key as a .pem file. You can specify key type as rsa and if you do not specify it, the output will still be rsa type which is the default type. You can also specify the key format as pem or ppk. The use of –query “KeyMaterial” prints the private key material to the output and the –output-text > my-first-keypair.pem will save the private key in the specified pem format.
When you run the above command, you will not receive any output. However, you can go to the destination folder where the private key is saved to check. IIf you were in the downloads folder, you will see the private key is saved there.
You can also verify through the AWS console or by using the describe-key-pairs AWS CLI command:
PS C:\Users\ABHIJEET\downloads> aws ec2 describe-key-pairs --key-names my-first-keypair
{
    "KeyPairs": [
        {
            "KeyPairId": "key-0f0b3b950aa4ac60b",
            "KeyFingerprint": "46:54:ee:35:e1:4d:63:23:05:fe:00:46:96:65:93:c5:b3:f8:15:59",
            "KeyName": "my-first-keypair",
            "KeyType": "rsa",
            "Tags": [],
            "CreateTime": "2024-04-13T16:13:46.486000+00:00"
        }
    ]
}
If you want to delete a key pair, you can run the delete-key-pair command and specify the –key-name.
aws ec2 delete-key-pair --key-name my-first-keypair
This will delete the key pair and you will receive an output with the key pair id.
{
    "Return": true,
    "KeyPairId": "key-0f0b3b950aa4ac60b"
}
Generate Key Pair using PuttyGen and Import it to EC2
Another method of creating key pairs is to use PuttyGen for generating key pair and then import it to your EC2 dashboard through the console of using AWS CLI.
To install Puttygen on your computer, you will need to install Putty. Puttygen is included with the Putty.msi installation package.
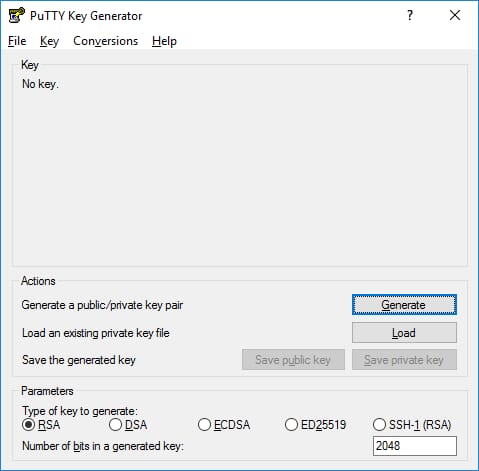
Now, to create a keypair using Puttygen, install Putty and then search for Puttygen in the start menu. Launch Puttygen and then select RSA from the type of key to generate. Then click on generate and move the mouse on the blank area to create some randomness. As you move the mouse, you will see the green progress bar advancing. Soon, key generation will be completed.
Once the key generation is complete, you will see the public key file highlighted in blue and you can copy this file. Now, go back to the AWS console and open the EC2 dashboard. Select key pairs and then from the action drop down menu, select import key pair. Give your keypair a unique name and then paste the contents of the public key that you copied into the box. Click on save.
From the Puttygen dashboard, click on save private key and save it by the same name as the public key.
You have your key pair ready and you can apply it to your instance. In the key pair dashboard inside AWS console, you will see your new public key listed and the private key in .ppk format is saved on your computer which can be used to connect to your instance with the help of Putty.